

Are you guys busy decking the halls? To be honest, we’ve been trying to get our Falalala on but we’ve all been sick. I think we’re on the mend and we’re trying to get back on track and get our Christmas up before Christmas actually arrives!
One of the things that I have told myself this year going into Christmas is to use what I have already. I’m trying as hard as I can not to buy anything new this year because I have an attic stuffed full of Christmas stuff already. I’m once again forcing myself to be creative, use what I have and most importantly, have fun doing it with my family.
So this brings me to today’s post, these fun little “Merry” and “Noel” Christmas pillows using my free printable:


I just love all of the fun and text Christmas pillows that are out right now but since I’m not buying anything new, I had to get creative. All I really wanted was just a couple small Christmas accent pillows to add to my existing pillows out on my porch and throughout my home. These little pillows adds just a little pop of Christmas and they are small enough that they blend in perfectly with any other color of pillows or fabrics:
This project is so easy and all you need to do is print this free printable that I made directly onto fabric and then either sew it up or make a quick “no sew” pillow. If you’ve never printed on fabric before, you are in for a treat because it’s so easy and you’ll start thinking about all of the other projects that you can make.
So to begin this project, you will need to download the printable by clicking the hyperlinks directly below:
*** Be sure and print a test copy first on standard 8.5 x 11 copy paper to make sure that your ink levels are good. If you’re running low on ink, you may end up with pink pillows!
For fabric, I used a lighter weight canvas type fabric that I found but you can print on almost anything. I have printed on thick canvas before with no problem with my printer but you may want to try something medium weight first if you have never printed on fabric before.
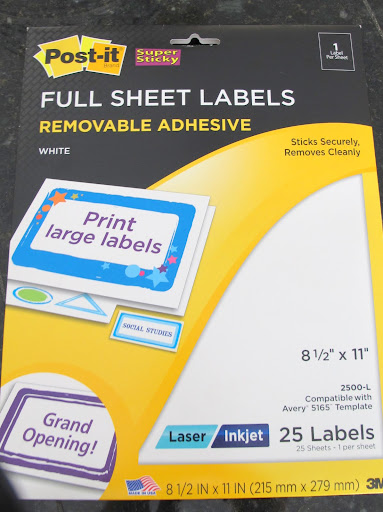
Once you decide on your fabric, you’ll need to attach it to an 8.5 x 11 piece of adhesive label paper to the back of the fabric (you can also iron on freezer paper too!):

Trim your edges so that you do not have any fabric over the edges of your paper.
Before I hit print, I tool a credit card and went over the back of the adhesive paper and fabric to make sure that the adhesive was completely attached along the edges and all over. I then I hit print and ran the fabric through my printer. It prints out perfectly!

Because the printer ink needs to dry, I carefully removed the fabric from the adhesive back and laid it flat to dry on it’s on for an hour. After the hour, I use a hot iron on the highest setting (no steam!!) and ironed it twice (let it completely cool in between each ironing). This will heat set it so the ink will not bleed. However, because it is printer ink, you are not going to want to wash these little pillows. You can spray a very light coat of scotch guard and that prevents it from bleeding if it gets a little wet.
Now you’re ready to make your pillows. You can either sew the pillow or do a no sew with steam a seam. I sewed mine with another piece of canvas on the backside and this is what it looked like when I was ready for the stuffing:

This is such an easy project and again, if you’ve never printed on fabric before, this is the perfect beginner project to try this technique.
By the way, I have shared a lot of fabric printing projects and gift ideas if you’re looking for more printing ideas. Two years ago, I shared how to make personalized fabric photo albums for the holidays using various free printables online like this one:

I also shared a gift idea for making personalized pin cushions by using the free monogrammed printables that you can get from Printable Monogram here and make to make this:

Thanks for hanging out with me today and if you are a printable fanatic like me, be sure and take a look at the Christmas printable that I shared last week exclusively for LD Products. You can get to that post by clicking here to download the image below.

I will be back shortly with something sweet (and salty).
Cheers!
Cyndy
Sharing Post:
darci says
Hi, love your blog, so grateful for all your amazing ideas and motivation! interested in printing off printables but was wondering what type of printer you recommend? Thanks, happy holidays!
Cyndy says
I use a wireless HP 5510 Photo Smart that I purchased at Best Buy a couple years ago for around $100.00. I absolutely love it and it’s perfect for all my printables and the quality is outstanding. I believe that getting a printer that’s made for printing photos makes all of the difference if you like to print printables or photos. The wireless is great and can go in a cabinet or tucked away. Hope that helps! Thanks for stopping by Darci!
Jessica says
This is super cute. Dumb question: What kind of printer do you use for printing on fabric?
Cyndy says
You an use any kind of basic printer Jessica! Printers are designed for thicker things like heavy card stock for brochures and you would be amazed at how easy it is to run fabric through your printer. I have even run thick drapery backing (with the rubber backing) and it goes through beautifully. I would test a medium weight fabric first if you’ve never printed with your printer before. Just make sure to attach it to label paper or iron on freezer paper. That fabric has to have something holding it.
Thanks so much for stopping by!
Rebecca says
Wow – these are amazing. I had no idea you could print directly onto fabric like that! I just hand stencilled some festive totes – but this would give a really similar effect. Thanks so much for sharing.