

This last week, I turned my kitchen into a serious craft production factory. With Teacher Appreciation Week next week and Mother’s Day just around the corner, I went into full production mode and made a project that has been on my to do list for almost a year now.
One of my favorite DIY gift ideas is printing on fabric. It just makes me giddy and all tingly! You guys may remember a similar tutorial that I shared last year on making personalized fabric photo albums for the holidays like this one:

This tutorial today is pretty much the same technique but using a different fabric and using the awesome free monogrammed printables floating around Blogland. Specifically, the gorgeous monogrammed free printables created by the super talented ladies from one of my favorite blogs, For Chic Sake:

Let me just say, Jenny and Louisa hung the printable-chic-monogrammed moon! If you’re not following For Chic Sake, trust me, you will want to after you see this!
Jenny and Luisa have taken online printables to a whole new seriously chic level. They churn out amazing DIY project ideas every 30 seconds and each printable and project they share just blows me away. Let me just show focus on some just a few of the printables they offer… for free!! (Just click on the image to go right to For Chic Sake’s Printable page on their website)

The best part of all is that For Chic Sake gives you several colors to choose from for each monogram printable and then all you do is type in your initials of monogram and print! It’s so easy!
I have used For Chic Sake’s monograms to create personalized stationary gifts and I personalized my calendar by printing my monogram on card stock and sliding into my calendar:

Ok, so that brings me to my project today, framed monogrammed pin cushions and framed cork boards using For Chic Sake’s monogrammed printables. Pretty personalized pin cushions are perfect to place or hang in a closet, next to a sewing machine or on a desk. I wanted to make these and give the pin cushions to all of my daughter’s teachers:


I’m so excited with how fun these turned out!
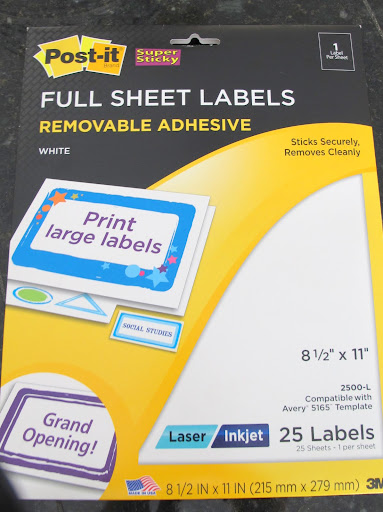
So to begin this project, I went to For Chic Sake and downloaded their awesome Chevron Monogram in my first color choice and then I opened it in Adobe Reader. I followed their great instructions and typed in the initials I wanted to use. Before I hit print, I took a piece of white broadcloth fabric (which is the thinest I could find) and I attached an 8.5 x 11 piece of adhesive label paper to the back of the fabric:
Before I hit print, I toolka credit card and went over the back of the adhesive paper and fabric to make sure that the adhesive was completely attached along the edges and all over. I then I hit print and ran the fabric through my printer. It prints out perfectly!

Because the printer ink needs to dry, I carefully removed the fabric from the adhesive back and laid it flat to dry for two hours:

At this point, you have to be really careful because the slightest bit of water or moisture will make the color bleed. So it’s important to let the fabric dry and then iron the monogram on the highest setting with no steam. I thoroughly ironed the monograms twice.
I then lightly sprayed them with three very light coats of Scotch Guard. It’s safer to do three light coats than one thick coat. Because I’m giving these as gifts, I wanted to be sure that they would hold up and not bleed.
Next:
1) I traced the glass in my 5 x7 frames on a piece of mat board
2) I cut out my mat board
3) I cut out five layers of batting a 1/2 inch smaller than my mat board (frame won’t close if there is to much batting around the edges)

4) I placed the batting in the center of the board and then covered the batting and board with another piece of plain white batting and pulled tight and taped the edges down on the back side of the frame (with Frog Tape):


If you want to add a cork board for larger 8 x 10 frames (do not need this for framed pin cushions), follow the same steps as above except I used only two layers of batting and before you add your batting, trace the inside of your frame to cork board, cut and tape to the center of the mat board:

Because the cork board is so thick, you do not want it along the edges because the frame will not close. In other words, you want the cork (and the batting) only in the center part of the frame that is opened to ensure that your frame will close.
5) Next, I covered my pin cushion with the monogram (be sure and center it) and did the same thing as above; pulled tight and tape on the backside:


Then slide the open frame over your pin cushion and close the frame backing:
There are so many DIY gift idea possibilities using this technique. You can cover photo albums or journals, make small monogrammed pillows or even make fabric gift bags. If you can think of more ideas, please share them in the comment section. I would love for us to get a running list. I know there are so many things we can do.
Well friends, I hope you all have a fantastic weekend and I will be back on Monday. By the way, if you missed May’s Printable of the Month that I shared on Wednesday, you can get to it by clicking the image directly below:

Cheers!
Cyndy
Sharing this post with:
Home Stories AtoZ {Tutorials & Tips Party}
Somewhat Simple {Thanksgiving Link Party}
Skip to My Lou {Made by you Mondays}
Savvy Southern Style {Wow Us Wednesdays}
Shabby Nest {Frugal Friday}
Tatertots & Jello {Weekend Wrap Up Party}
Under The Table Dreaming {Sunday Showcase}

Heather @ Southern State of Mind says
This is the best idea! I am adding this to my Christmas craft list for the women in my family. Thanks so much for the great tutorial
Cyndy says
Thank you Heather! I’m so glad that you stopped by!
Louisa says
Glad you love our free printables! I’m amazed at what you did with them, these are the perfect gifts for sure!
Cyndy says
Thank you Louisa! I’m your biggest fan! Thanks for sharing your creativity with us!
Karen says
What type of printer are you using for this project. You have so many color choices for ink.
Thanks,
Karen
Cyndy says
I use an Hp Wireless Color Printer that I have been really pleased with the colors. I also always check the box “best” in my advance printer settings for print quality. I think that helps as well. Here is the link to it on Amazon for more specs http://www.amazon.com/Hewlett-Packard-Photosmart-Wireless-Printer/dp/B005FTYNI6. Thanks for stopping by Karen!
debbie says
These are great for gifts. You did a beautiful job. Thanks for sharing.
Cyndy says
Thank you Debbie and thanks for stopping by!!
Erin @ Sometimes-Homemade.com says
A framed pincushion is an awesome idea! I love it even more because you made it with a monogram.
Visiting from Tatertots & Jello link party.
Cyndy says
Thanks Erin! So glad you stopped by!
Melissa Leech says
Adorable project! I was wondering if you could share where you got the gorgeous frames from? Love your blog, you are so creative!!
Thank you,
Melissa
Cyndy says
Thank you so much Melissa! The frames came from Hobby Lobby and if you don’t have a Hobby Lobby near you, you can shop online at http://www.shophobbylobby.com Thank you for stopping by!!
Angela Fletcher says
Great idea! For an even cheaper option, you can iron fabric to the shiny side of freezer paper before printing. It works perfectly and the same piece can be used several times. I’ve done this to print many things on cloth, including tags to put inside clothing gifts that I’ve made. 😀