


***updated 11/20/12.. I am now offering a newly designed PDF download of the tree cone patterns (5 sizes in one) and detailed tutorial for making fabric covered poster board tree cones. I have redesigned and made it so much easier to create fabric covered cones. You can see the latest information here.
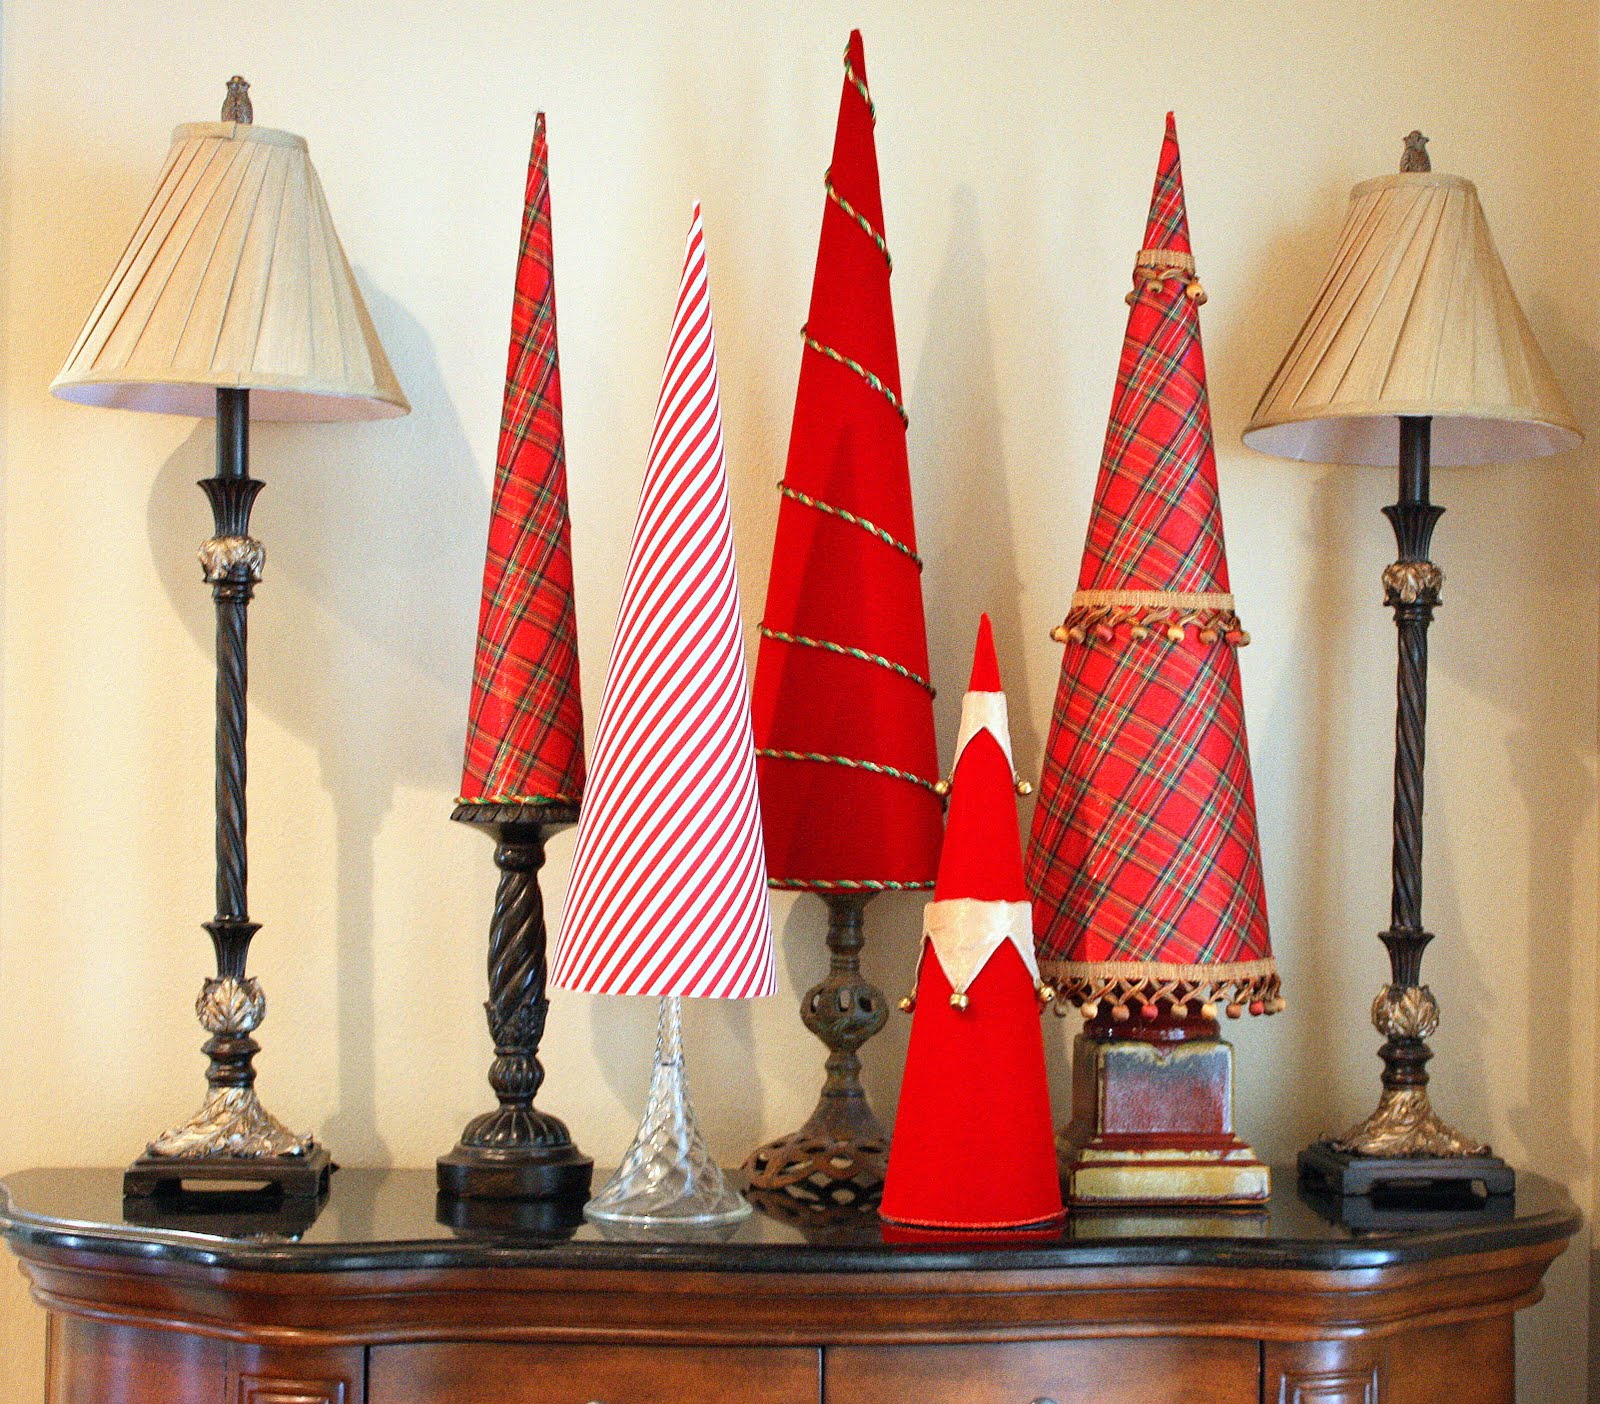
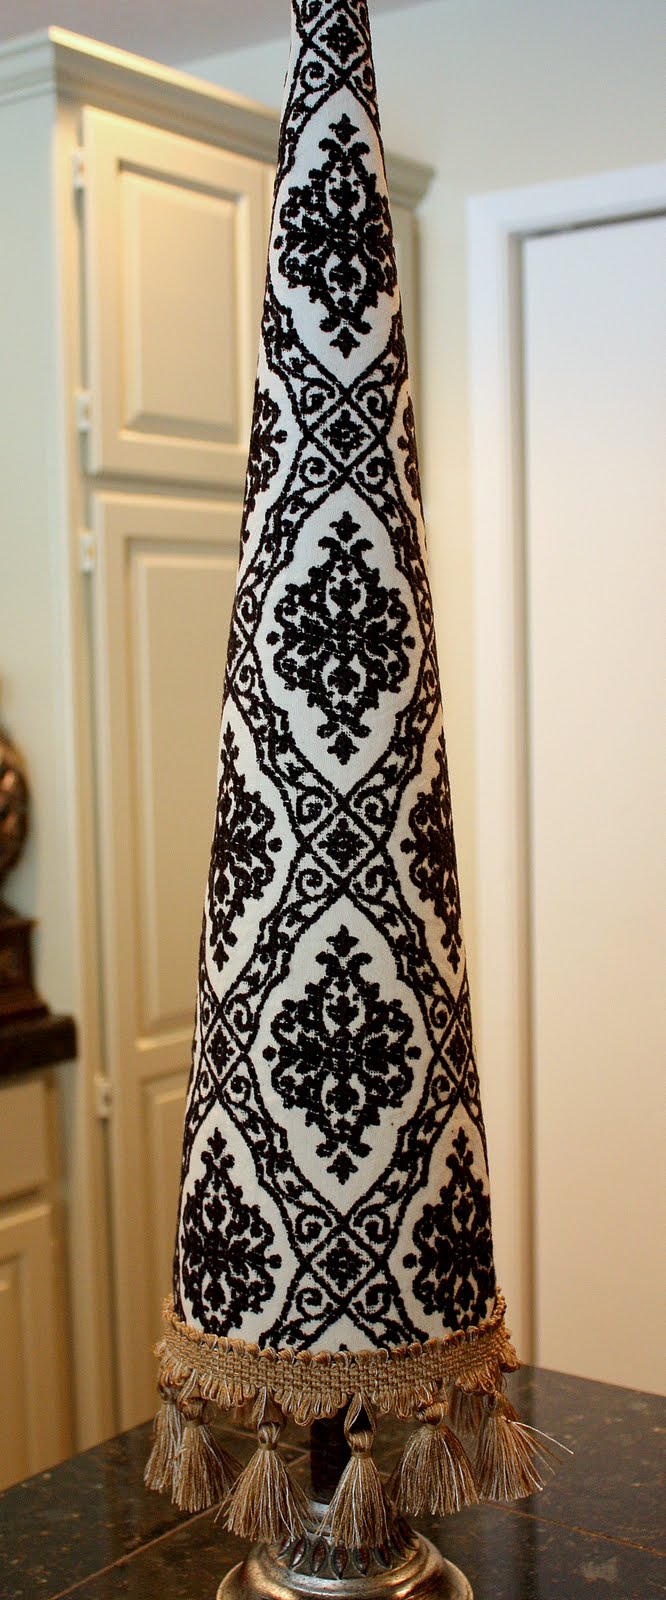
I absolutely LOVE the fabulous and whimsical fabric covered Christmas cone trees that I have been seeing in stores this Christmas season. I fell in love with a BEAUTIFUL set of these trees at Neiman Marcus in Houston and wanted to buy them until I saw that each tree STARTED at $85.00! Yikes!! When I lifted one of the trees up to look a little closer, I realized that these fun trees were just cardboard that had been rolled into a cone and adorned with fabric and trim!
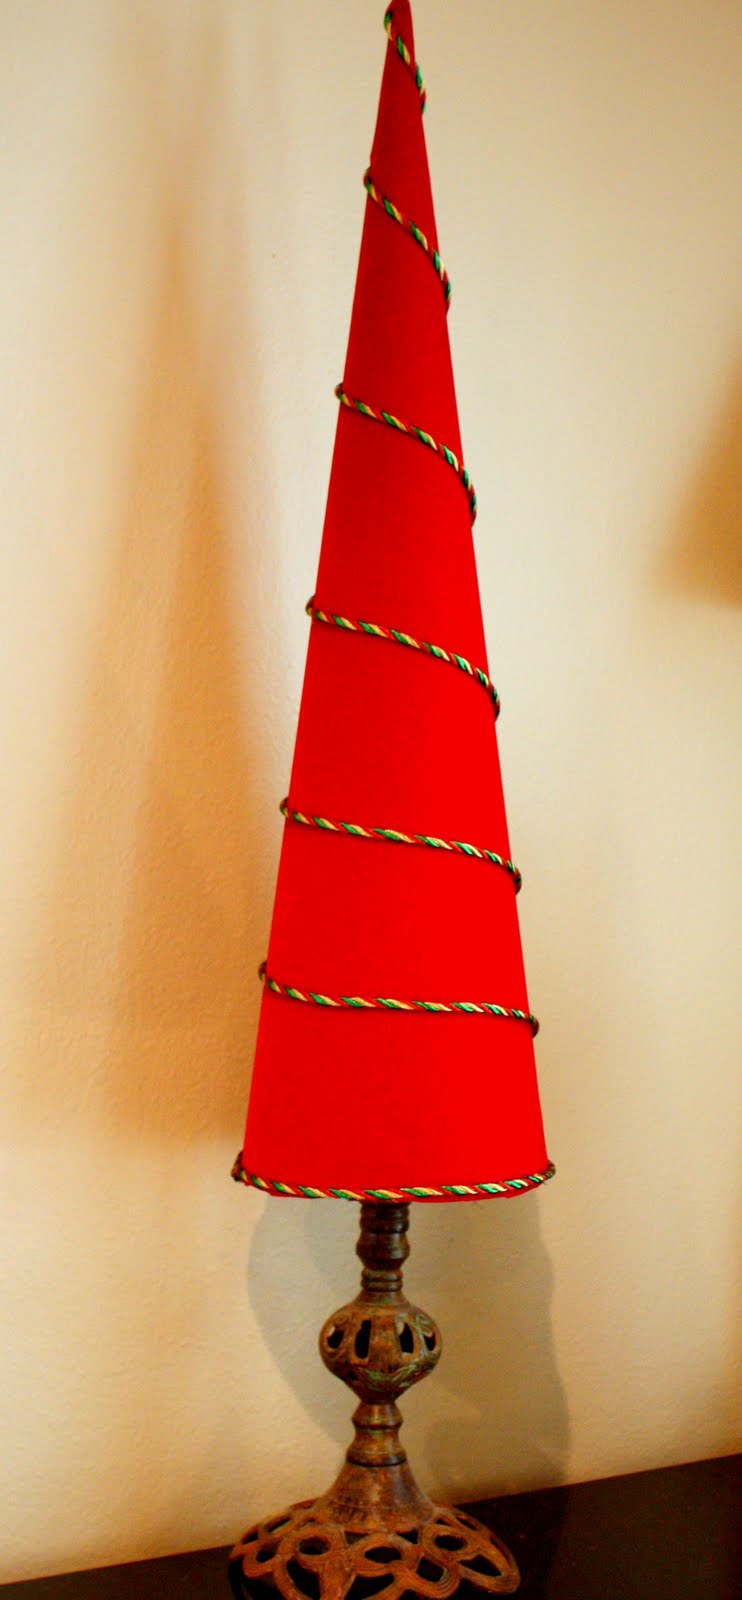
So I sat down, talked to my engineer neighbor and figured out how to make a template for the cone and now I can’t stop making them! They’re so fun and easy and I rest them on tall candle sticks/holders to raise them up and display them. Because the cones are hollow, they just slide ride over the candles holders and fit snug and will not move. Here is the picture of the holders I used without the cones:

Cones over candle sticks:
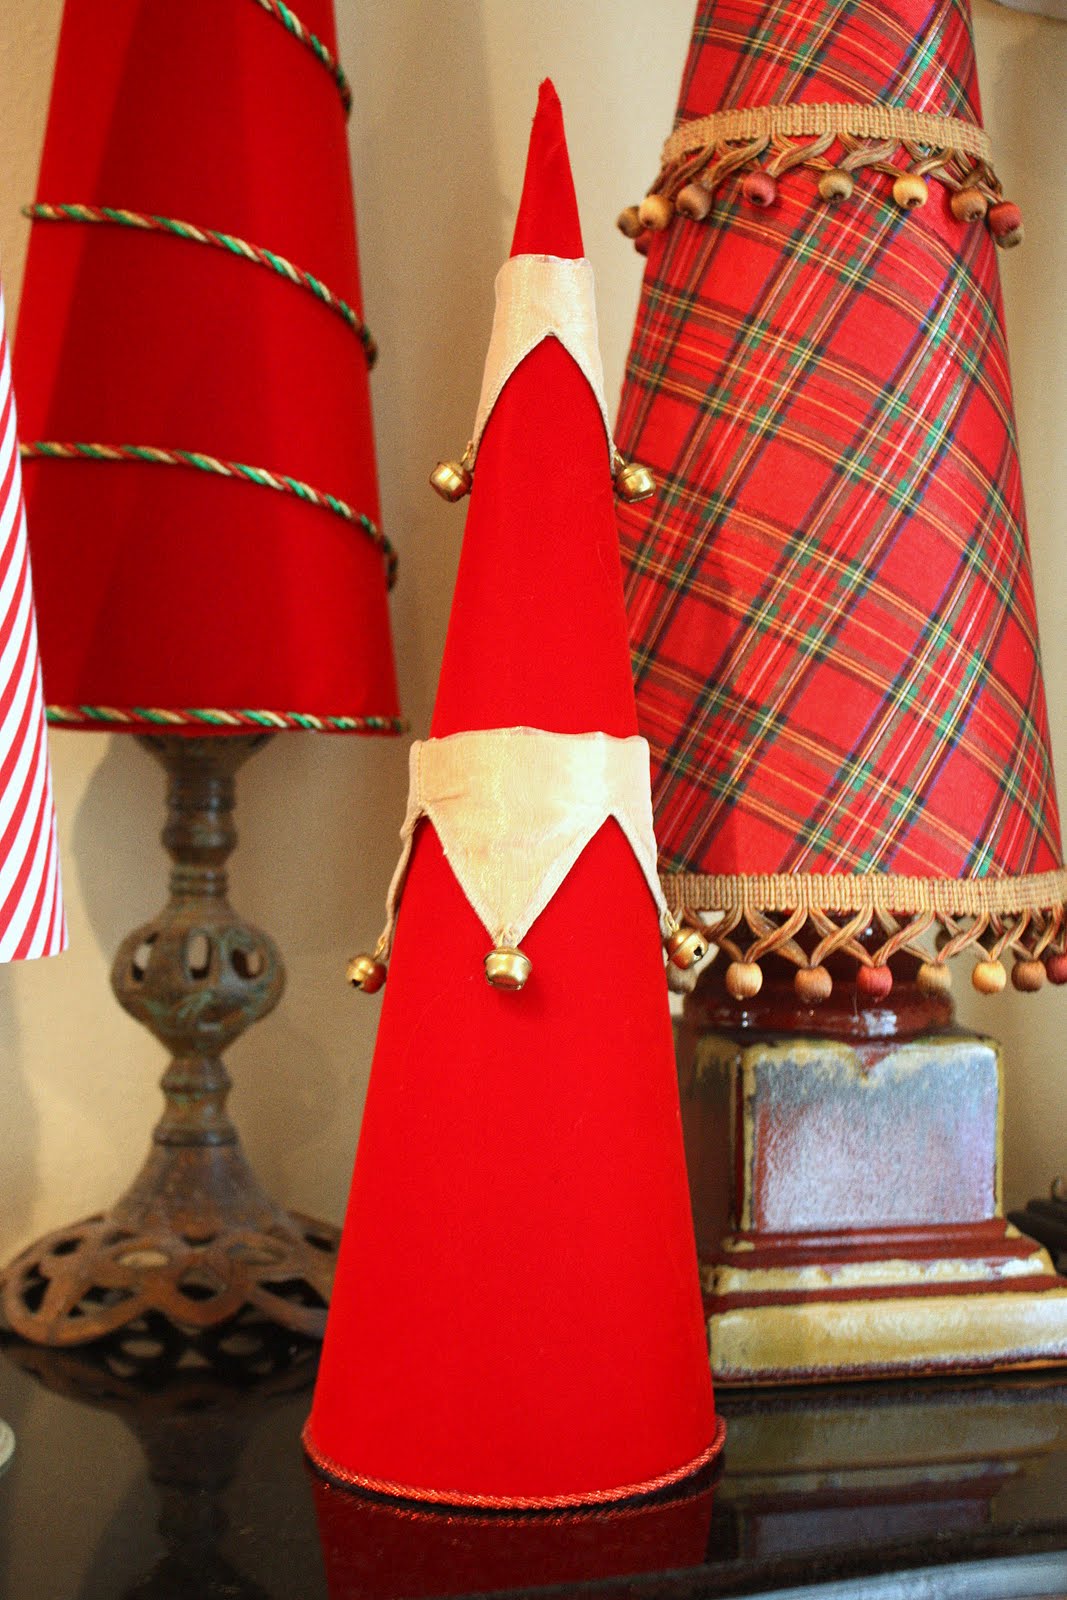
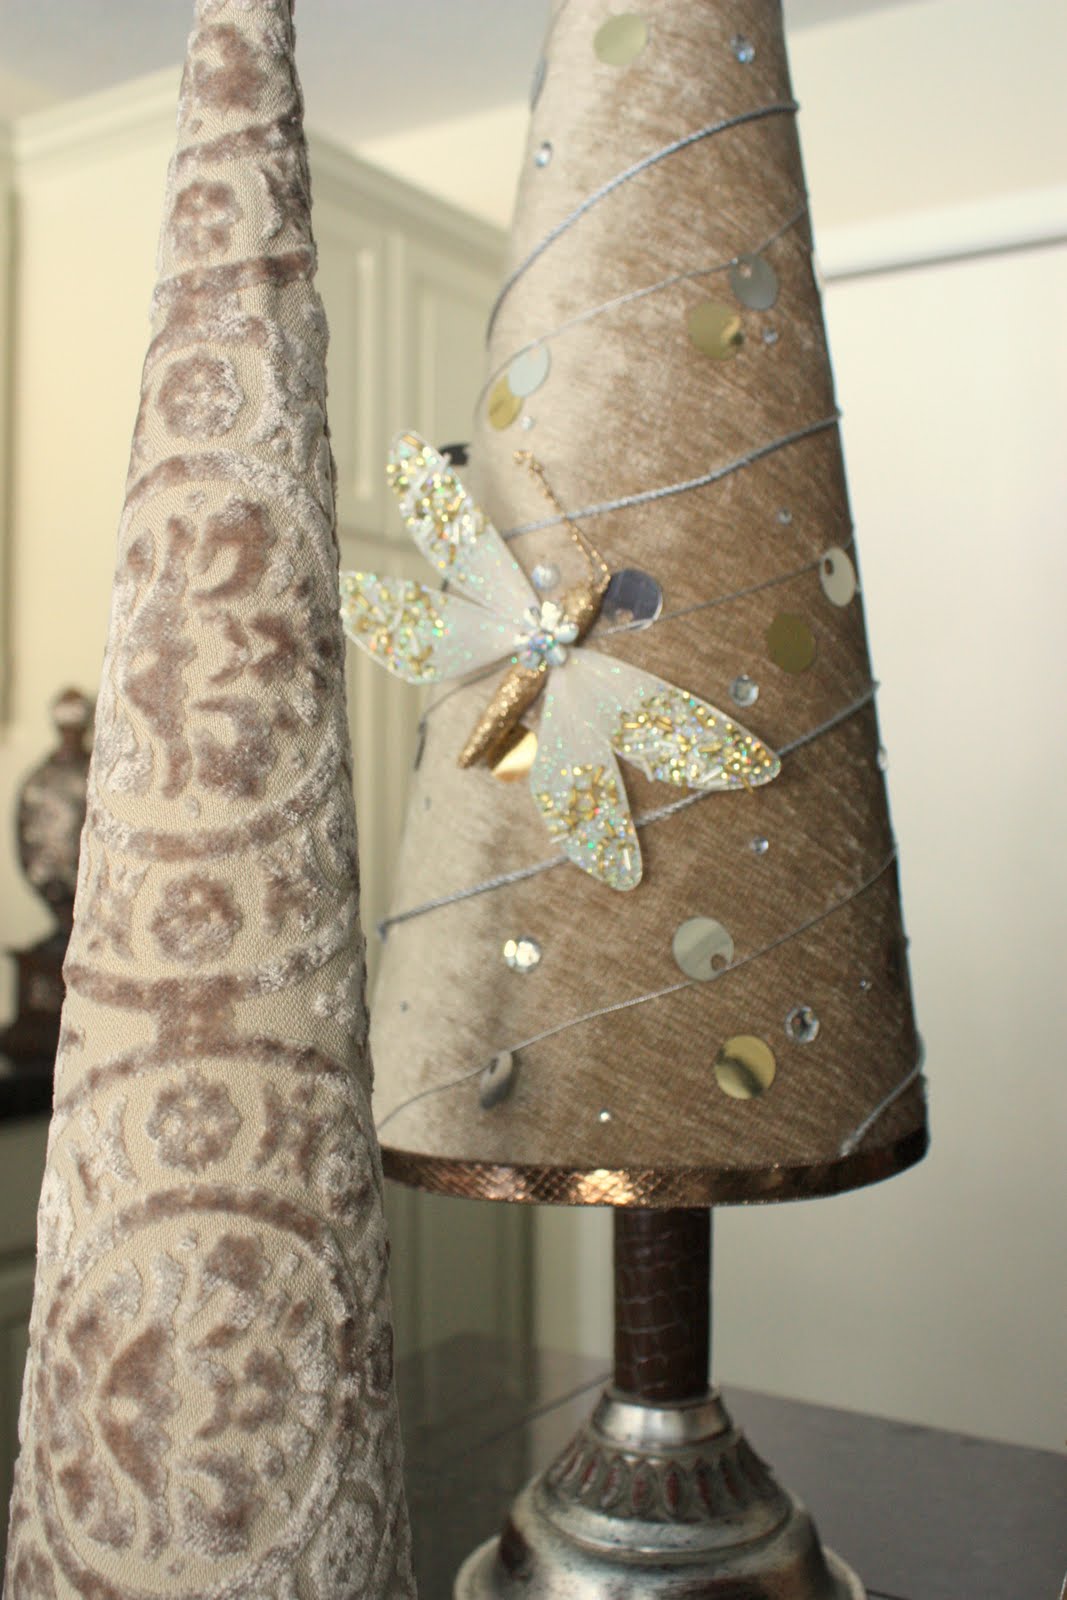
Here are so close ups of some of the trees:

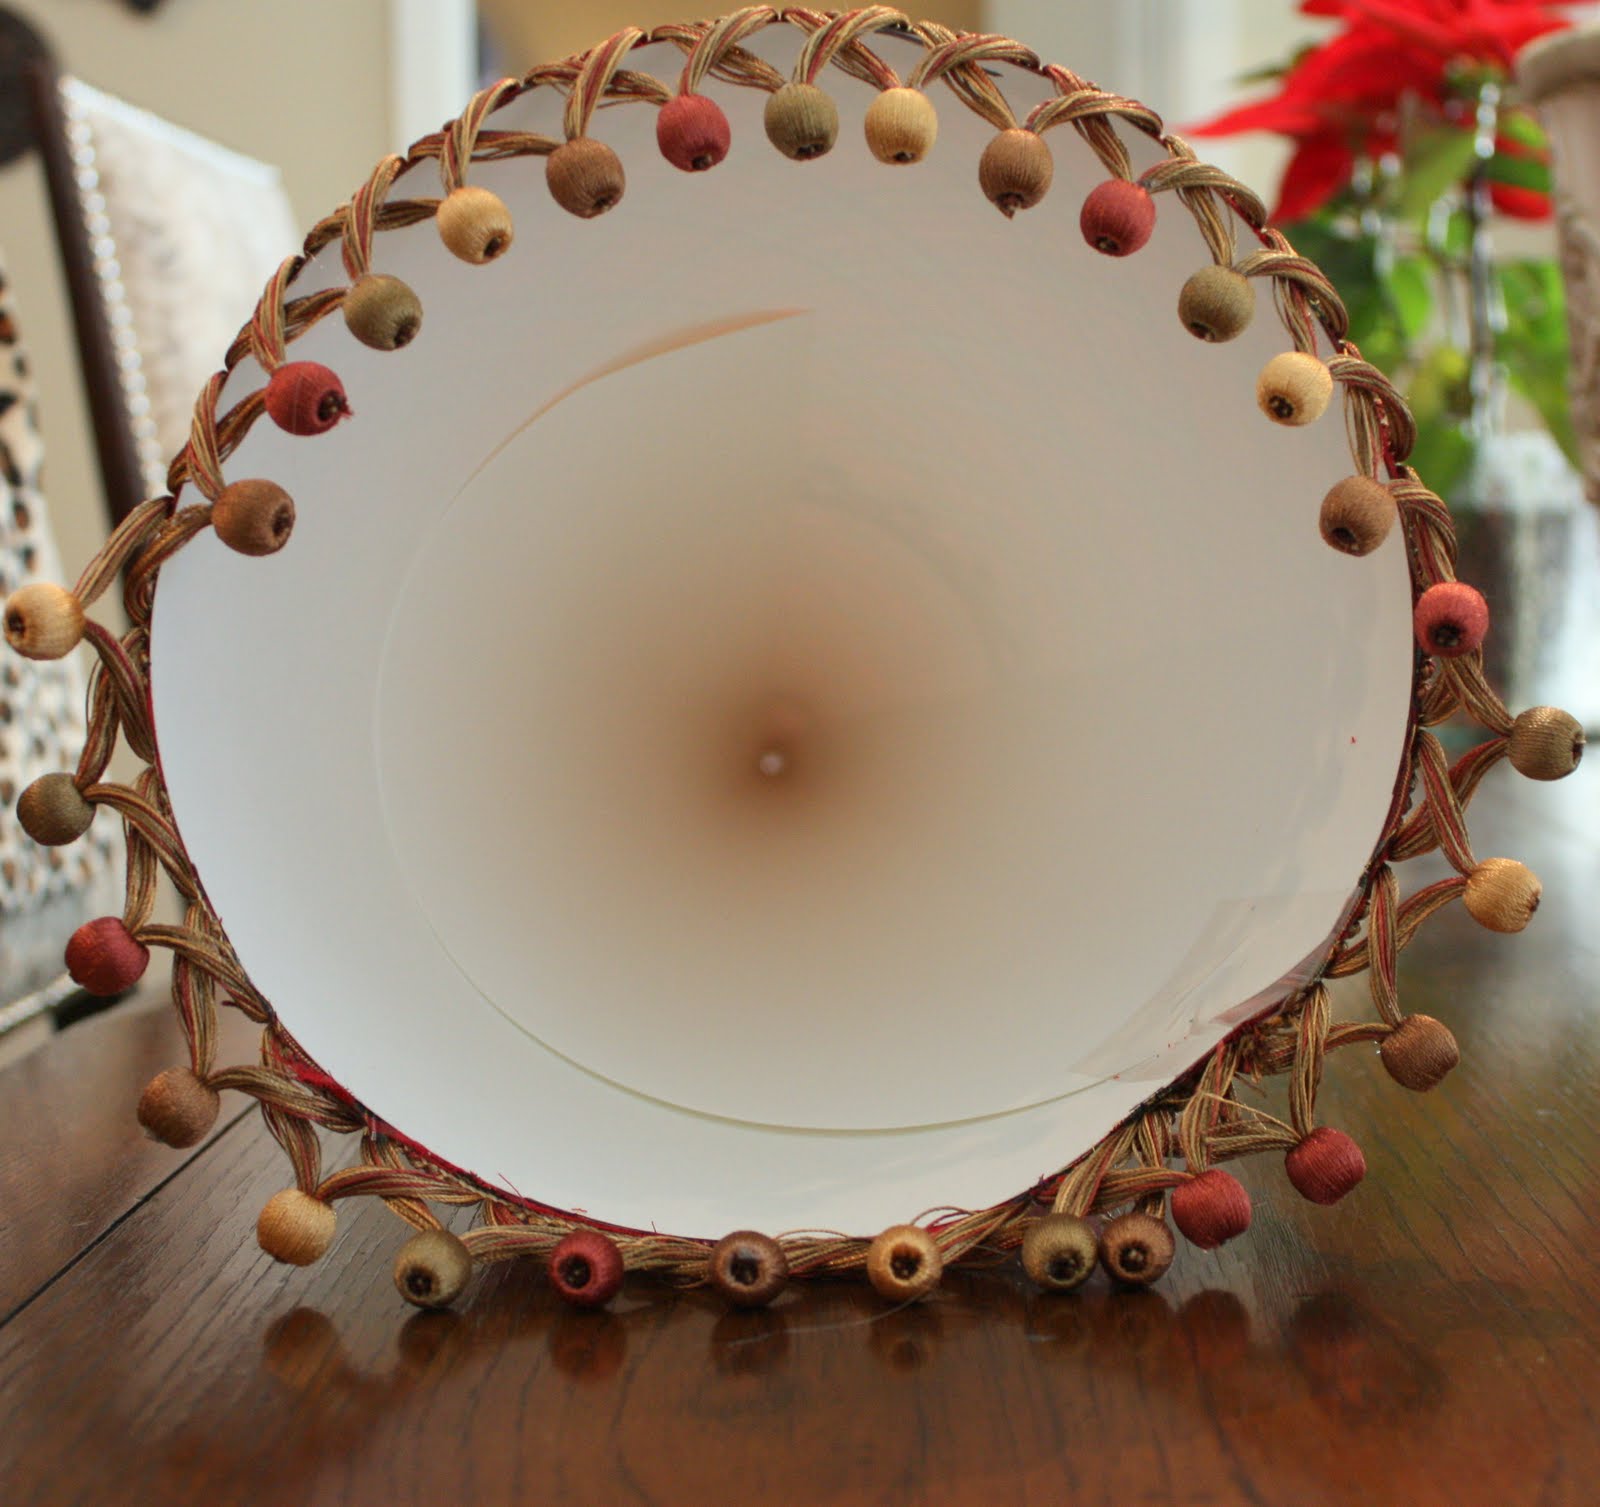
The great thing about this project is that is very inexpensive. I used extra fabric and trim that I already had in my fabric bin and used poster board that I paid 3 for $1.00. I was a little worried about the poster board being sturdy enough but it turned out to be perfect because the way I created my template, I basically double up the poster board. Here is what the inside of the covered cone looks like:
These cone trees are super sturdy and I will be able to pack them away by covering in tissue and stacking them on top of each other and use them again next year. I used several different types of fabric and found that upholstery/drapery fabric worked the best.
There are so many endless possibilities with these cones!
***updated 11/20/12… This post is two years old and has been updated and I am now offering a PDF download of the cone patterns (5 sizes of cones all in one pattern) in my online shop. Included with the template download is a new tutorial which is different from the old tutorial here that I posted two years ago. I designed the template download in a way that we can now attach the fabric to the poster board first using pattern guide lines the rolling and securing the tree cone. The template and tutorial download eliminate several steps from the old tutorial and it is so much faster to create fabric covered cones. You can find out more about the templates here.
I’ll be posting some more fun Christmas projects in the next week, so please check back! Enjoy your Christmas crafting!

Step 1- Making the Cone Templates:
1) Take a piece of standard poster board and cut out a two inch strip down the longest side of the poster board like this:

2) Take a tack and push through one end of your strip. On the other end poke a hole with a knife or ice pick and push through your pencil like this (it needs to be a tight enough fit for the pencil to stand up:

3) Push the tack and strip through corner of new poster board (not the poster board that you used to cut your strip) and keep the tack corner over the edge of a counter like this:
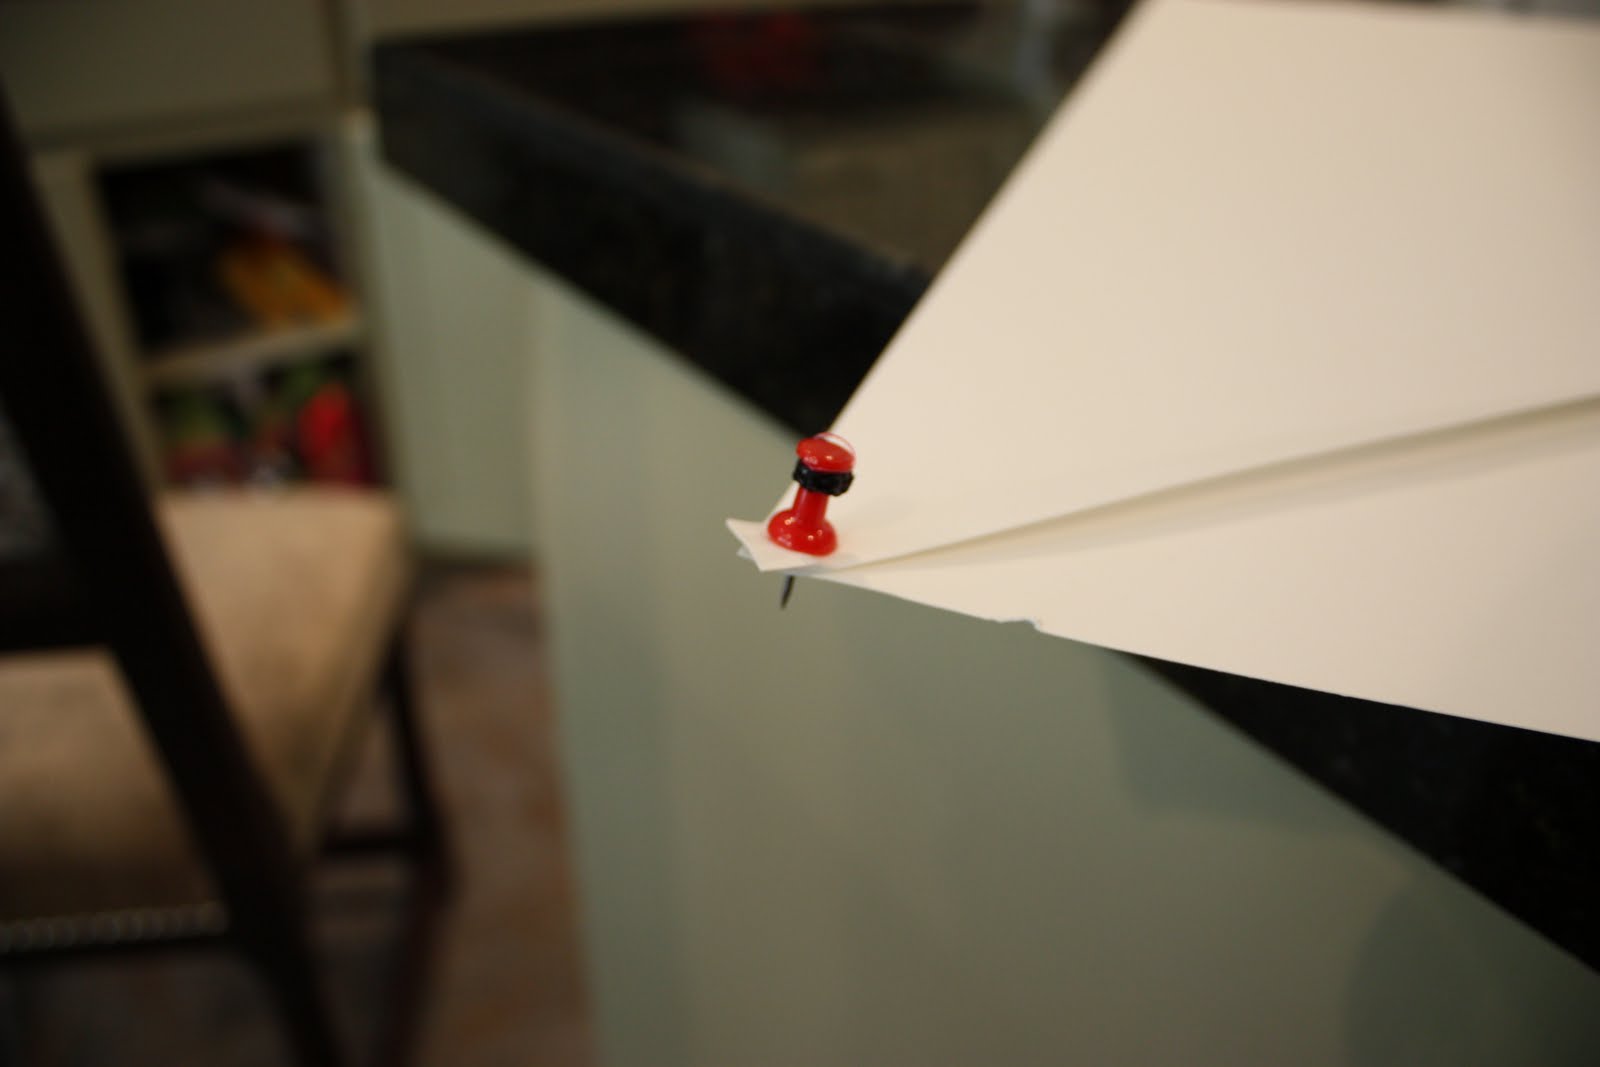

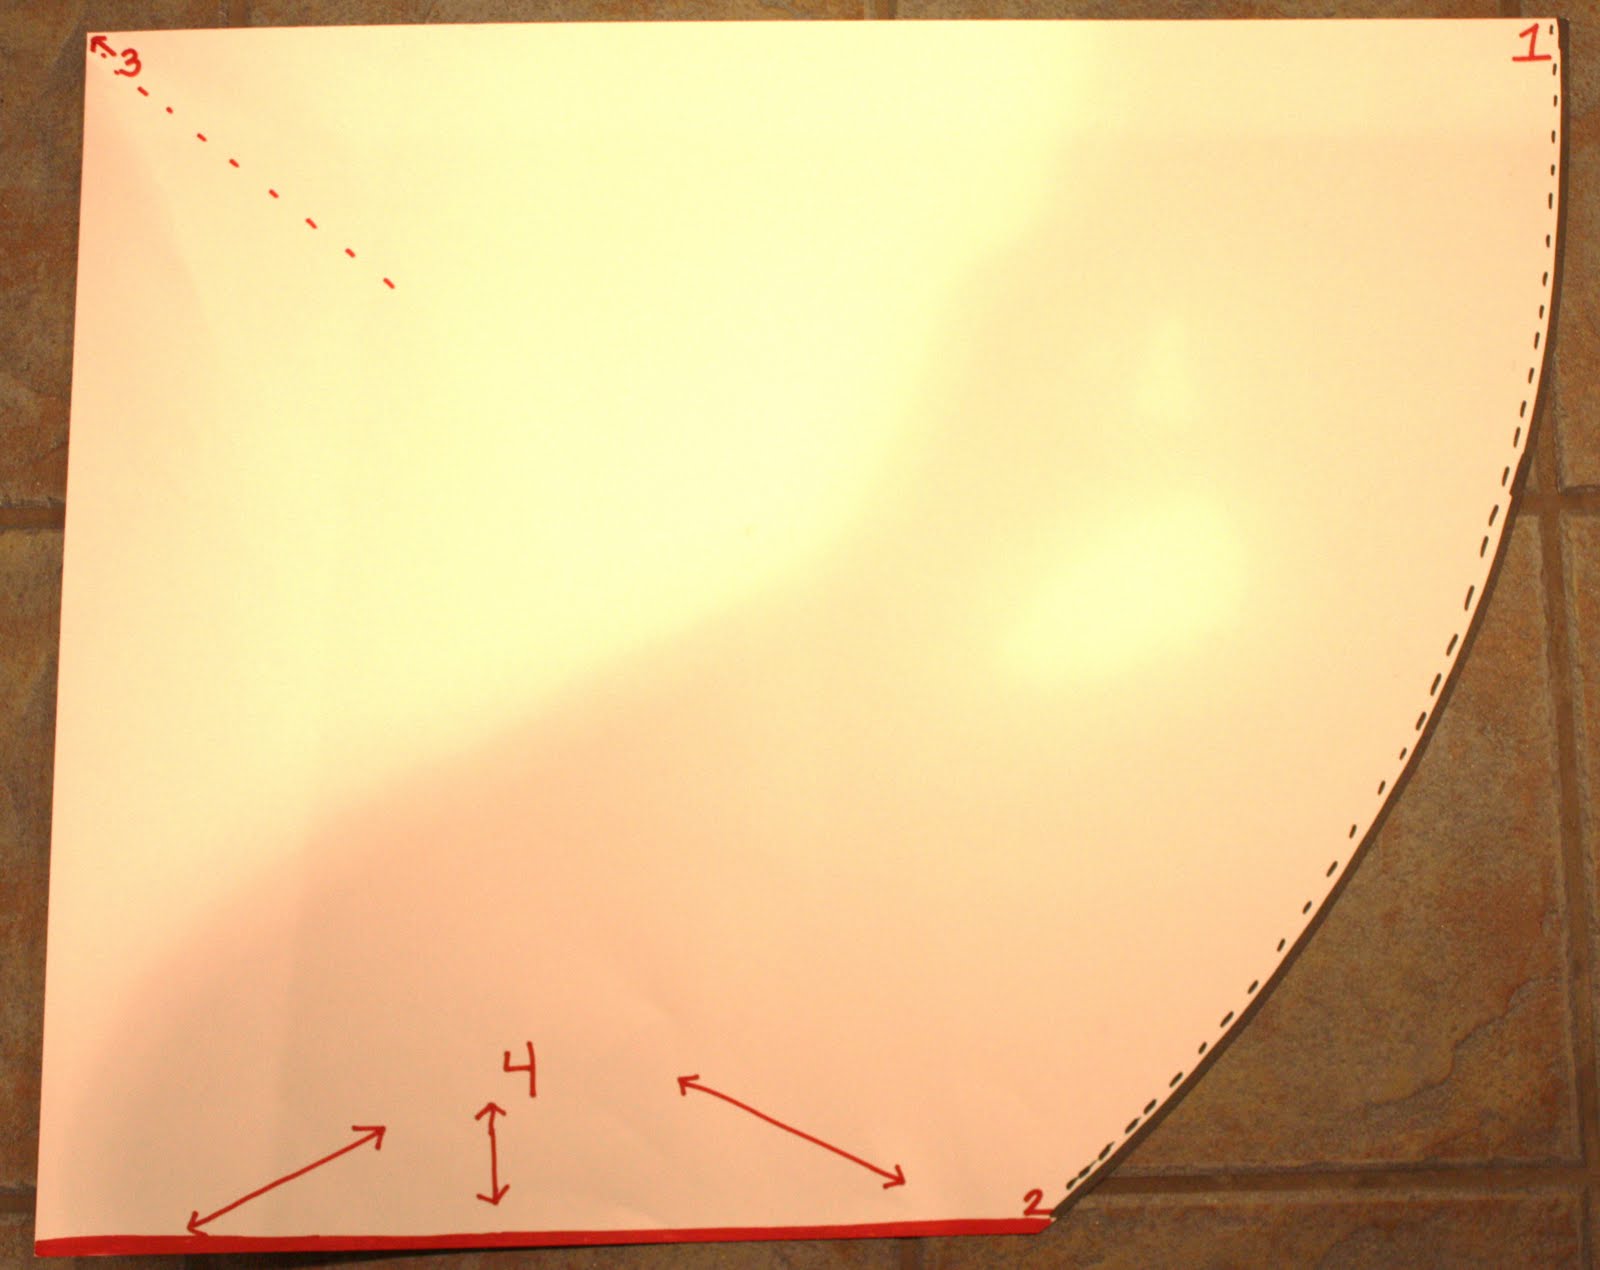
4) While holding your tack with your left hand, with your right hand, gently start your pencil at #1 as seen in the picture below and use your strip as your line guide but make sure you do not pull so hard that the tack and corner are raised up. Draw your line until you run out of board and reach #2 as seen below (click on diagram picture for close up):

5) Cut out your template and it should look like this when your done:

6) Cut several short strips of packing tape and have them ready to grab as you begin rolling your cone.
7) The best way to begin rolling your cone is to start at the tip (#3 on above diagram)) and sort of fold/arch it over gently halfway at your tip (see my red dashes of where to arch and tuck) until you get a good point and HOLD! Now, go to the base of the cone and tuck until #2 is on top of #1 or until you have only the rounded curve (black dashes on diagram) around your base and hold! Go back to your tip and tape it down at the point to secure. In order for your cone to stand level, you can only have the curved edge where you drew your line (black dashes on diagram) on the bottom like this:


8) Once you have a good point at the tip of your cone and point #4 is completely tucked in the roll, secure the cone with packing tape vertically from the tip down to the bottom over the board edge. It took me a couple tries before I got my cone rolling down pat and now I can do it in my sleep!

9) To make a middle size cone, repeat the above steps but cut 4 inches off of your measuring strip. To make a small size cone, cut off 4 more inches off of your middle size measuring strip. I made 3 templates and now all I have to do is pull out my template to trace and no longer have to use a measuring strip.
Step 2- Covering the Cone in Fabric
1) Once you have your cone ready, lay out your fabric on a large surface. Again, keep in mind, upholstery/drapery fabric are ideal, heavy cotton is ok and velvet and stretchy fabrics are very challenging.
2) If you are using a solid fabric with no pattern or pattern that you do not care how it is laid out, lay your cone down on your fabric with the line/edge of the cone meeting the edge of the fabric. Be sure and allow an extra 1/2 inch at the tip like this:

3) With a black sharpie, trace along the base of the cone onto the fabric and then gently turn your cone and trace again (if you’ve ever done a fabric cover for a lamp shade, it’s the same technique) You will do this until your line/edge of your cone has made a full circle.
4) As you turn your cone to trace, watch and hold your tip so as your turn your cone, the tip of your cone also turns on the fabric as it would naturally roll as well. Like this.
5) Trace your cone until the edge/ line of the cone has made a full roll and draw a line on the fabric from the bottom to the tip to show where you should cut the fabric give an extra inch or so).
6) Cut out your fabric (cut inside black sharpie marks) and it should look like this :

7) Go outside and spray your cone completely and heavily with a good spray adhesive. I use Treehouse and it is awesome! Be sure and spray well, especially the tip.
8) Place your sprayed cone onto the fabric at the same position where you started when you began to trace onto the fabric.
9) Begin at the tip of your cone and roll the edge of the fabric up like this:

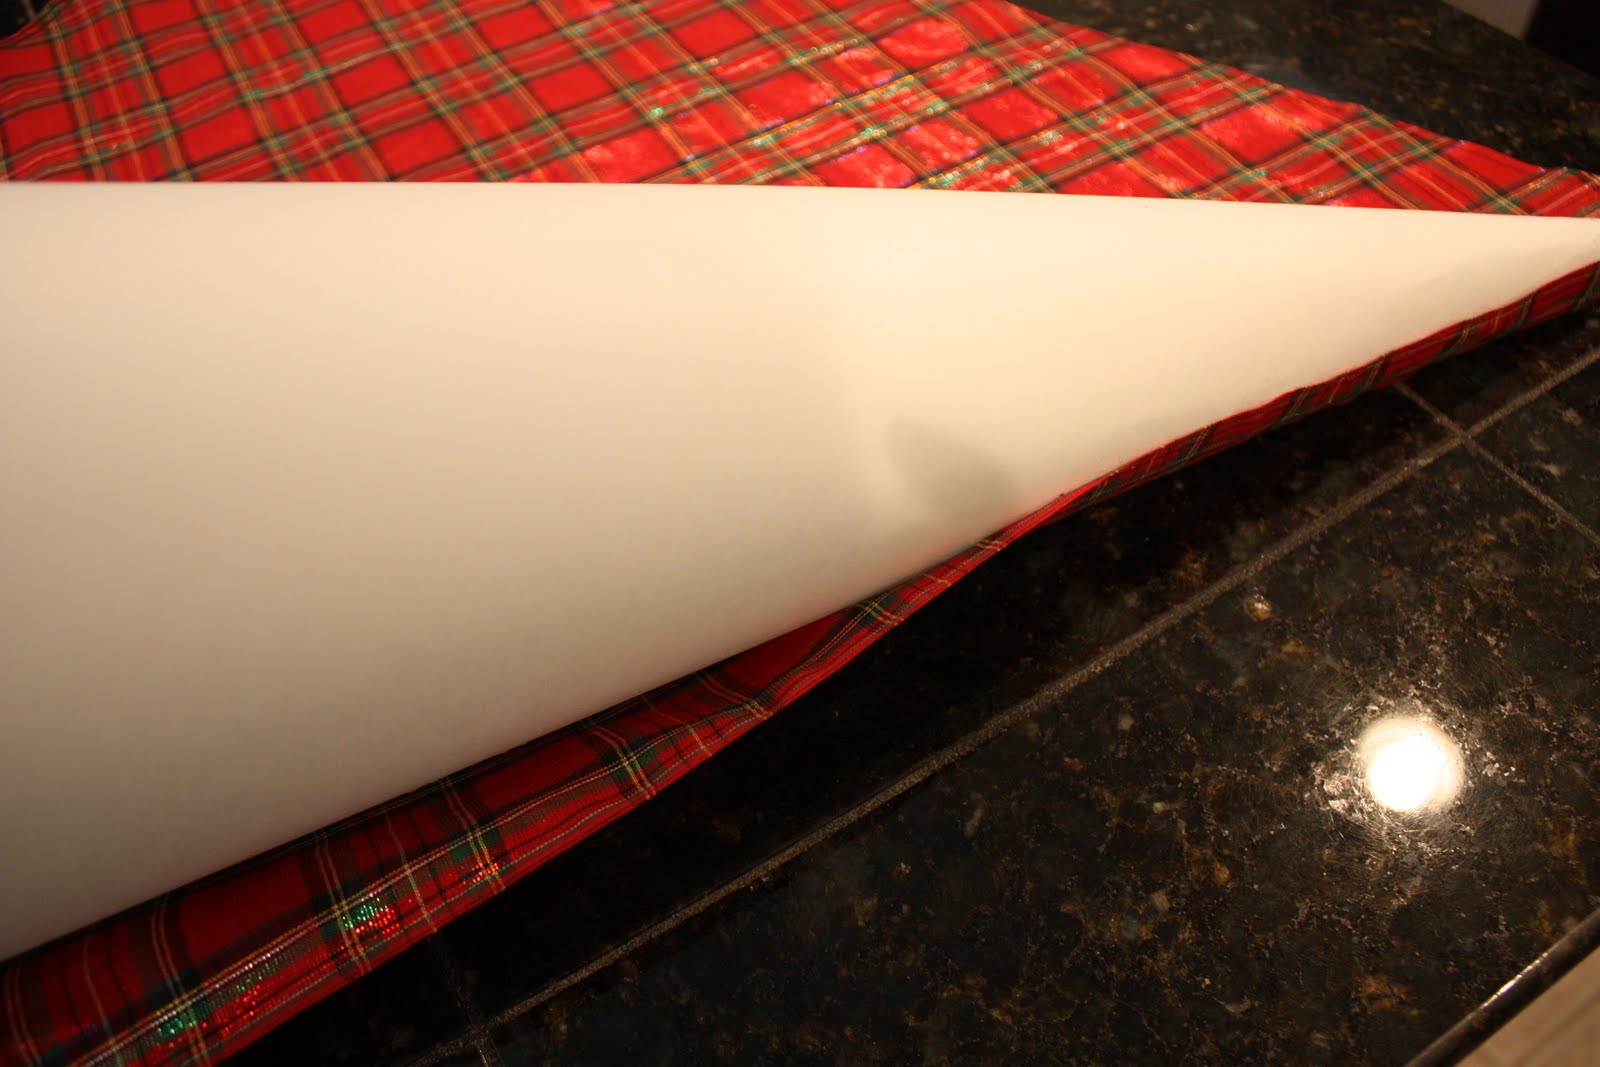
10) Now begin gently rolling the cone around the fabric, slightly pulling down and watching that you do not get creases. If you are using an upholstery fabric, you will not have to pull much and it should just perfectly roll and stick onto your cone.
11) You should have about two inches or less of fabric left over that you will need to go outside and spray to get it to stick to the rest of the fabric covered cone. I sprayed the loose fabric well, especially the tip like this:

12) Finish rolling the excess fabric gently onto the cone pressing down to get a flush line like this:

13) Trim any excess fabric around the base of your cone to get a perfect line around your base.
14) If you are using a pattern fabric that you do want to position on the tree a certain way, place your cone on your fabric in the middle of fabric with 1/2 inch extra at the tip and draw your line at the base and then roll half way to the right and draw your line at the base (draw line from base to tip as well). and then go back to the middle and then roll half way to the left and draw your line at the base and draw a line from base to tip and cut your fabric.
Step 3- Trimming your Fabric Covered Cone
1) You can trim your tree with anything! Fabric trim, Christmas cording or anything!
2) Use a glue gun to begin gluing your trim at the tip of your cone on the backside where the line of the fabric is (this will be the backside of your cone).
3) You can either trim diagonally down along your cone for a sloping garland look or vertical, glueing every so often.
4) I think it looks more finished to add cording or trim around the base of the cone.
5) No more steps, get creative and have fun!
That’s it for now!! Enjoy making your fabric covered cones and I would love to see pictures of your finished creations! So fun!
Cheers!
Cyndy
Emily says
Fascinating!! I love it! One question. And this might seem obvious. But how did you attach the tree to a base if the inside is hollow? Thanks for sharing your creativity!
The Exchange says
Emily, I just altered my post to better explain the candle stick base. I also included a picture of the holders without the cones. The cones fit perfectly and snuggly over the holders. Thanks for your comments and stopping by!
Real Mountain Values (Brianna) says
These are awesome! Not having a Neiman Marcus nearby I haven't seen anything like that.
Thanks for the indepth tutorial. I always just roll paper and then try to cut the bottom level when making a cone…
Of course now I can't think why in the world I was making a cone… Right! Party hats.
Anyway, this method is much better. I can't wait to try to make these.
Rita says
I'm totally going to make one right now. Thanks for the tip~
Giggles says
I LOVE LOVE LOVE them!! So unique, and you put really nice patterns together! Thanks so much for sharing the instructions!! What a gift…hope I have time to try one!!!
Hugs Giggles witn sincere thanks!
rebecca @ older and wisor says
Cute as is, but the trim and dingle-balls make it over the top spectacular! I would never even guess that it was posterboard….and I'm adding it to my list of things to make..;)
Condo Blues says
I love this idea! I've been looking for tall cones to make trees with but haven't found any that are big enough.
Bettymnz4 says
I am your newest follower!!
I use heavy magazine/catalog/unwanted mail to make my cones. I'll read your tute carefully to see how I can make mine sturdier. Thanks for the tute.
Also, thanks.so.much for the eye candy ideas. Your pic really get my creative juices flowing!!
Skooks says
What a cute idea! Thanks for sharing the tutorial.
Brooke @ Finding Home says
Tooooo cute! Great tutorial!Thanks for sharing!!
Kim @ Cheap Chic Home says
A-DORE! I made my cones this way, but hung them as cones. This has my vote – a winter wonderland that you can change up on a whim.
Carolina Carters says
Those are absolutely adorable! 🙂
Heather says
Very cute and so simple!
Come check out my 12 days of Christmas crafts. Now following! Can't wait to see what else you come up with!
Heather @ The Other White House
kara@elements-interiors.net says
HEY Cyndy! Im your newest follower and CRAAAAAAZY about your blog! Those fabric trees…BRILLIANT!!! They are so PRETTY! I MAY can do this!! I would LOOOVE it if you would visit my blog and 14 days of christmas trees…I have a Giveaway you might like…I am SO GLAD i found your blog! Im gonna try these…cross your fingers 🙂
*ENTER CUSTOM FLORAL Give-Away Here *
xoxokara
lauren @ West Furniture Revival says
these trees look great. has a pottery barn feel to them…
Dacia says
These are really beautiful! Great idea!
Lisa says
These are absolutely gorgeous! I can't imagine anyone spending $85 on them when you can make them for so much cheaper. All your trims and accessories make them so perfect!
Holy Craft says
I love this! I am adding it to my to do list and featuring it on my blog I love it so much! Thanks for the inspiration. I'm now following you.
Rachel
http://www.holy-craft.blogspot.com
Ami w/AliLilly says
Are you kidding me!! These are fantastic!!!! I love them. And I thought my tissue paper trees were special!!! WOW! 🙂
Kelly says
girl you were not joking and kidding around with your cone trees were you! they look amazing! I just popped by from tdc and I recently "attempted" trees like this…although nothing like yours! nice work!
Michelle says
what a fantastic idea! I 100% love it and I think I might have to try it for my front hall table. I already have some trees there but I think 1 of these would be a great addition! Thanks!
Elaine A. says
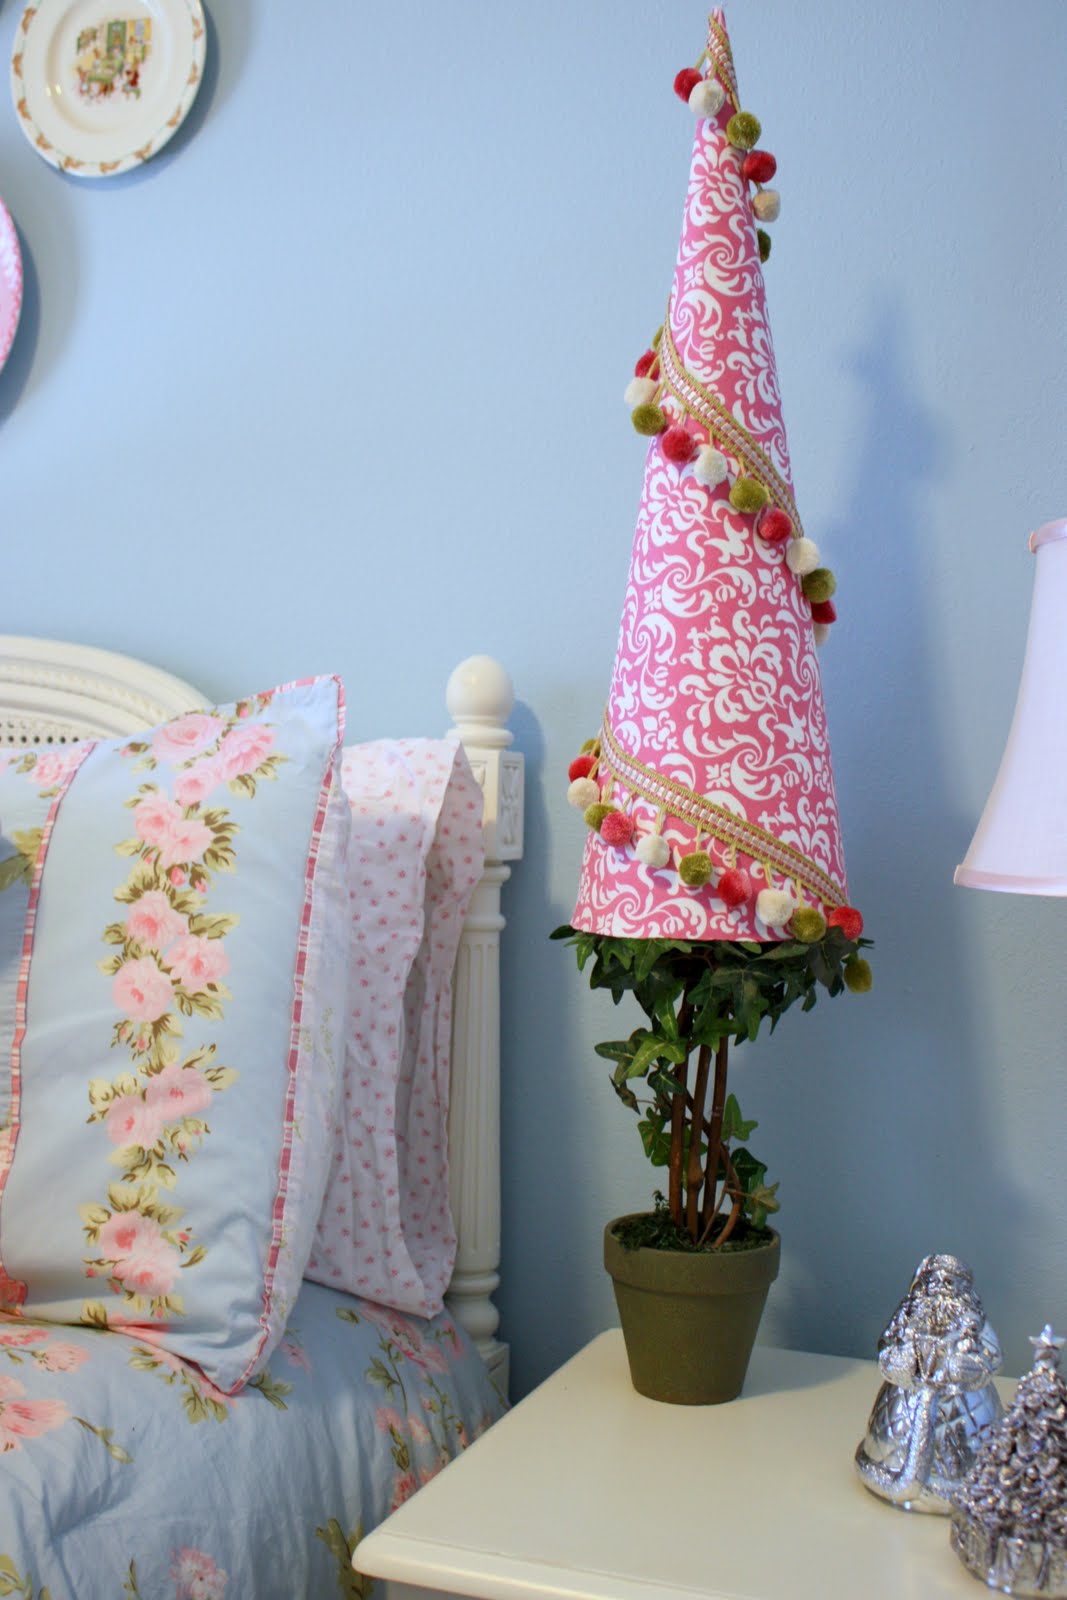
They are all so lovely. Especially the one next to the bed with the pom pom trim. What a wonderful idea to make these. Thanks for the inspiration and Merry Christmas!
Judy says
I am loving these. I linked over from finding fabulous. I love your blog as well so I am your latest follower. I would love if you would check out my blog and follow me back. Thanks. diybydesign.blogspot.com
Alicia says
Way cheaper than buying the paper mâché ones at hobby lobby on sale too. Great idea and very nice.
Michael - Innkeeper says
you ARE a genius! what a fab idea! and they look amazing and super expensive. thank you for sharing this. thank you! thank you!
Summer says
These turned out super cute!
Finding Home says
Thank you so much, fabulous idea, thanks for sharing!!!! Take care, Laura
Natalie@Endless Crafting says
Beautiful! Great tutorial too! Thanks for sharing!
Jen-CraftOManiac says
BRILLIANT love them all! I am stopping by from TT&J.; You should link these to my craft party on Mondays CraftOManiac Monday… Have a great weekend. Jen
Mrs.B says
LOVE it SO MUCH~Cute,Cute!!! 🙂
Andrea says
Great, creative idea, and one I'm going to try!
One Life Many Journeys says
Genius!!!!!!!!!
Dannyelle says
I love your trees, thanks for sharing the instructions. I think I might need to try your feather boa idea, in white. Or maybe some burlap? You've inspired me. Visiting from http://www.lifeisaparty.ca
Nita {ModVintageLife} says
I love these sooo much. Especially sitting on the candlesticks…I want to run out tomorrow and make some. And I just might…..
Your choice of fabrics and trim make these truly special. In another's hands. I'm sure they would not have turned out so incredible.
kimmykats says
Beautiful! Oh my these are amazing! I just called my sister and told her she has to make these! Thank you so much for the tutorial.
Tammy @ Type A says
this is great, i bought some paper mache trees from hobby lobby and covered them with paper, but i was limited to the size the store sold. with this i can make them as BIG as i want. thanks for sharing.
TheCraftInMe says
These are absolutely gorgeous, thanks for sharing!
Meg says
This is awesome! Totally trying this out!
My House of L says
Love the black and white tree….thanks for the tutorial!
≼mE aNd mY tℎrIfTy IdEaS≽ says
Just awesome!!!
Jen says
Very crafty! I love them all!
Simone says
Too Cute! Thanks for sharing how to make them, it's the best way to blog!!
Michele {The Scrap Shoppe} says
These are SO cute!! I love that you figured out how to make them yourself. This is so inventive. Love it!
Maria-Isabel @ Agape Love Designs says
those all turned out soooo gorgeously! wow i love them all! Awesome job!
The Extra Ordinary Bree says
AWESOME! Off to get some poster board!
Vivienne @ the V Spot says
Fantabulous! Very thorough tutorial also. Thank you!
Kathy @ Creative Home Expressions says
These are great! I have a stash of fabric samples and more that would probably work good for this project! Thanks for the tutorial, too.
Ann Marie | white house, black shutters says
I was just thinking about how I would go about doing a cone last night while trying to fall asleep. Slipping them over the candle sticks really brought this to the next level. Thanks for such a great tutorial, very thorough. 🙂
Cari says
These are so classy! Love it!! Found you through the Thrifty Decor Chick Christmas Tree Party…we had our own spin on the Christmas Tree Cones too! http://itstoilegood.blogspot.com/2010/12/christmas-tree-cones.html
A Vintage Vine says
Thanks for the detailed tutorial…These are so inexpensive to make and I am into that this year…Thanks
Elizabeth says
I LOVE THESE! Such a fun idea to be creative with! So bummed I don't have time for more Christmas crafting this year! Would love for you to visit me at Sew Chatty and link up to Made with Love Monday! The party will be open until Friday if you want to link up multiple projects. Hope you have a great day! http://sewchatty.blogspot.com
Erin @ Crafts and Sutch says
Just wanted to stop by and let you know that I featured you over at Crafts & Sutch today! Please stop by, take a peek, and grab a SUTCH an Inspiration button! 🙂
Thank you so much for sharing!
Erin 🙂
Bella@Bellabeforeandafter.blogspot.com says
Oh yeah, here's one more WOW, those turned out FLIPPIN COOL as heck. I LOVE them, LOVE them I tell you. Please come link these to my Christmas party **6 weeks 2 JINGLE** I JUST HAVE TO HAVE THEM there. I must make me a little forest, of them, THANK YOU so much for a GREAT tutorial.
I also LOVE your blog, and am super happy I found you,,, I am your very HAPPY newest follower….
Bella 🙂
Lei says
JUST BEAUTIFUL!
Jena @ Involving Color says
Love this! I found your blog through CSI Project. I'm your newest follower!
Vanessa says
I featured your awesome tutorial here: http://vanessascraftynest.blogspot.com/2010/12/diy-roundup.html
Erin says
Fantastic!!! I love their substantial size! 🙂
Sparta Savings says
This are so awesome words cannot describe! I need to make some! I would love to have you link up to my Saving Christmas Party at: http://spartasavings.blogspot.com/2010/12/saving-christmas-week-8.html
the cape on the corner says
how lovely, and what a great tutorial! thanks for sharing!
Pamela says
Love this idea sooo very much! Thanx for sharing!
Crystal says
Love these! Featured them on my blog!
a little lovely says
i'm featuring these tom! thanks for sharing 🙂
WobiSobi says
Love your sight!! I am a new big fan.. I featured these on my sight with a link to yours.. Beautiful.
alwayscharlie says
Wow! these are wonderful!! So glad I found your blog!!
Anonymous says
Thank you so much for sharing this wonderful Christmas decoration! I am charmed with your trees and impressed with your photos and writing style. I first saw your photo on HGTV RMS. Thank you, Suzanne in Florida
Steph says
Been meaning to stop by as I keep seeing you featured everywhere!!! Love the scale and the fabrics you chose. You made it look so easy to make. Beautiful!
Barbara Jean says
This looks hard!!
Guess I will not know until I try it huh?
Thanks for the tute.
blessings
barbara jean
Kim @ Sand and Sisal says
Beautiful tutorial! I now know what I can use all my extra fabric for. Thanks for sharing with us!
The Exchange says
Thank you SOOO much to all of you!! I have tried to keep up with sending emails back to each of you but I confused myself with who I have emailed!!Hopefully I will figure it out! Thanks again, I am so blown away!
Cheers!
Cyndy
Aaron says
Thank you for the FABULOUS tutorial. I have wanted to make one of these but thought that I would have to buy one of those paper mache cones from the craft store that cost $1.99 each…and well, I'm just too frugal for that. Thanks so much!
-Aaron
JRFrugalMom says
These are awesome, and I just bookmarked your post. I am going to go through my scrap bag, and the boys and I will be making these later on.
Thank you for this great idea….you just got yourself a new follower. I can't wait to see what you do next.
I made Danish Christmas Hearts and Paper Christmas Stars to cheer up our tree.
Happy Holidays!
JRFrugalMom from
Frugality Is Free
C.R.A.F.T. says
I'm so impressed! come on over and link up to MMM 🙂
librarianism says
Thanks for the tips, especially the string compass! I made a couple of cardboard trees using a surprisingly large piece of cardboard I found after finishing a roll of wrapping paper. The string worked great.
Amanda says
Just dropping by to let you know that I linked to this post in a round up today from the Home & Garden channel at Craft Gossip. 🙂 This will appear in the main Craft Gossip RSS feed, on the main home page and can be found directly here
http://homeandgarden.craftgossip.com/25-christmas-tree-crafts/
If you would like a "featured by" button, you can grab one here!
http://homeandgarden.craftgossip.com/grab-a-craft-gossip-button/
Tammy@InStitches says
I just made some and I'm getting ready to post them on my blog, come by and have a look !
Bridget says
These are GORGEOUS!! Thanks so much for sharing
EMILY says
Very cute! I hope I get around to this porject soon! I would imagine that if you got some iron on interfacing to back your cotton fabrics with they would roll onto the cones as easily as drapery fabrics.
Gail says
Thanks for sharing the tutorial as well as showing the before/after on the tree stands.
Very nice.
Trendy Tree - Jeannie Pence says
Love this! Thank you so much for the tutorial….Can't wait to try one myself and I want to share on my blog with a link to back to you. Perfect way of using those old candlesticks that have been put away….I'm thinking of a grouping for Halloween…spidery material….black feathers…..bling….
Anonymous says
Thank you Thank you Thank you!!!!! I love this idea. I am soooooo going to try this.
D @ Shady Porch says
Fabulous idea! I can't wait to make these! What a $$ saver!
The Exchange says
Thank you so much ladies! I'm thrilled that you are going to try these! You won't be sorry, they are so fun to have grouped together. I warn you, it's addicting once you start making them.
Anonymous says
These are GREAT!! Just found your site and can't wait to browse it some more!! Like the Dragonfly on one of the trees…did you make or just buy and place on there? Thanks, Carrie!
Mimi's Moments says
Love the trees, can't wait to make my forrest!
cynthia says
Just found your site via Tatertots and Jello and I LOVE it! I'm looking forward to making these trees and trying the screen print pillows. You are definitely the inspiration I needed to get off the couch and craft again! Thank You!!
Cathy says
Hi there,
Great tutorial! It’s not easy to write a tutorial and get down to the very basics so those of us (me) who are a bit slow can follow along quite nicely! Well done!
I have a couple of questions but I’m sure you’ve already tried all of this. Instead of using the 2″ length of paper as a guide still use the push pin but use string with a Sharpie attached to create the pattern (make a string compass)? Also, would it not be easier to leave the poster board pattern flat and then cut out the fabric with that pattern then shape the poster board into a cone? Would have to remember to have extra fabric so fold over.
Thanks gain for a great and easy-to-follow tutorial,
Cathy
Ronda says
I tried this with my smaller version (compass pen style) and it worked well.
Susan says
I think I would be tempted to add the fabric before rolling the cones. Any reason that would not work? You have done this and I haven’t so I need your input. Looks like I could just trim around the bottom with something and not have to fold the fabric over the inside. Would that work?
Elaine says
OMG! Love. Can’t wait to make.
Ella Egolf says
To make the cone sit higher on a shorter holder, I would cut a circle out of foam board and glue it to the top of the holder. That way the cone sits on the foam board circle rather than resting on the holder itself. You can adjust the height of the cone on the holder by adjusting the size of the circle that you cut. Cut larger, cone sits higher, cut smaller circle, cone sits lower. Hope this is a helpful hint!
Cyndy says
Well isn’t that smart!! What a great idea! Thank you so much for sharing it with us!
Amy @ Positively Splendid says
These are, quite possibly, my favorite Christmas trees in the blogging world! I linked them to a lineup on my blog of my favorite topiary tree tutorials today. Thanks for inspiring! http://www.positivelysplendid.com/2011/11/by-dozen-topiary-christmas-trees.html
LaPriel says
Love these! Thank you.
I don’t know if anyone mentioned this, but you could use iron on interfacing to stiffen your woven cottons to make them easier to put on.
chris says
Absolutely beautiful.Love the natural tree with dragonfly!So many different looks and options.Thanks for posting.
Dee says
Just lovely! I featured your fabric covered Christmas Tree Cones on my blog http://craftbliss.com/ and linked back to you. Happy Holidays! ~Dee
Julie Arnold says
Just want to say, I came over from pinterest, which I’m new too and love these trees of yours! I can’t wait to see how I do on a set of them, and I just happen to have a little mix of Christmas fabric to try them out of! thanks so much…:)
Ronda says
These are lovely….I do not sew, so I did not have scrap fabric. I am a scrapbooker and I had some decorative paper; so I made a smaller version and made three cone trees with co ordinating paper. I placed them on my existing candle holders and the look fabulous!! If I knew how to post a photo, I would surely do so. I would like to try the fabric cone trees, but this was a quick, easy, cheap and lovely project.
Debbie Elder says
I’m just curious how much fabric you would need for each cone/tree? I host a monthly Pinterest GNO and we are making these next. None of us are crafty but we all are now thanks to Pinterest!
Cyndy says
Hi Debbie!
How fun for the girlies! You guys will love this project and I actually did a GNO craft party with the cones in August and you can read about it here https://www.thecreativityexchange.com/2011/08/craft-party-christmas-in-august-3.html
As far as fabric goes, for the large cone I would say you would need a little bit more than a 3/4 yard with a lot of fabric left over. You need enough to completely roll it around. If you make your cones narrow, you can do it with a 1/2 yard. For the medium size you can get 2 or 3 medium cones out of a 1/2 and for the small cone you can get 5 plus out of half yard. Again, because you need the length and you have to roll, it’s an odd shape and takes more of the length of the fabric but you can use the left over fabric for other sizes. I hope that helps!
I would love for you to send me pics of your party and finished cones! Thanks for visiting Debbie!!
Tanya says
I’m in the process of making these and am wondering how you made the tip look finished? I haven’t started with the spray adhesive yet but am afraid I’ll have a funky shape at the tip. Anyway, I’ll go give it a try and see what happens. Yours are very beautiful – hoping mine turn out as well! Thanks!!
Cyndy says
Hi Tanya! I hope you figured it out, just got to my emails. You probably know by now that your poster board tip does not have to be perfect or even close to it. Once you roll your fabric around, you will make a perfect fabric tip. If it’s not perfect, tuck and glue and work with it! Have fun!
Beth Morrow says
I just love these!! I pinned it from Pinterest and am going to get going w maybe a few for Valentines and then Easter covered w grass and eggs . Love your site too. Great job…so much talent!
Beth
Cilla says
Have you tried cutting the material with the same pattern as cone and gluing the fabric on before rolling the cone? I’m sure it would take a little more material, but I’m wondering if it might be easier to cover. Any thoughts?
Kate Mills says
I think you might not have as smooth a finish this way. Did you try it?
Cyndy says
Hi Kate!
Yes, I have tried covering the poster board with fabric and then rolling but I have found it doesn’t work as well because you have to attach it somehow and I felt like taping it prior to covering with fabric holds the cones together better long term. The only way to attach after rolling with the fabric on the poster board would be with hot glue and it’s hard enough to hold the cone together after you have rolled it, let alone trying to hot glue it if that makes sense. The tape allows you to instantly hold together your cone shape. Thanks Kate!
Kate Mills says
Love these! Thinking they’d be great sitting on an urn as well. I’m thinking I’ll make a fabric template out of poster board too, so I can have a pattern and not have to roll to cut the fabric each time. I like to. Work on a handy piece of foam board far many crafts, so the push pin corner would be easier! I see these becoming an obsession, so I’m planning ahead to make multiples!
Sandra says
I loves these! I am going to definately give it a try. So I understand they are sitting on any type of candle stick with a pretty base?
Danielle Palma says
I absolutely love these. You have no idea how relieved I am to find your tutorial. I have been contemplating making these and after looking at prices for Styrofoam cones I just had to pass because for one they are not cheap and for two the sizes are very similar, not alot to work with but now I can go cone crazy.. Thanks so much 🙂
Independent Scentsy Consultant Terri Smith says
What a great idea! I think I will make some of these for my display tables. So cute!!
Karen Hermann says
I would love to know when your new templates are available for purchase. I just joined pinterst and found your site. Love this idea!
Deanna says
Please send me an email when the templates are available for purchase. Thank you. Love these trees.
Joni says
Beautiful cones. Tried searching Etsy for the templates but couldn’t find them. Can you please give me the link. Thank you
Cyndy says
Thanks Joni! The templates and my Etsy store are not set up yet but we should be in business by the end of the week. I will send you an email when the store is ready. Thank you for your interest and stopping by!
Maurine Huntsman says
Please let me know when the templates are ready for sale.
Thank you
Trisha says
Please let me know when the templates are available.
Thanks.
Lynette says
Please let me know when the template is ready. Thanks
Amy Coffey says
Love these!! Email when the template is ready. Thanks!
Jane says
Love! Please e-mail when template is ready for purchase. Thank you much!
Stacy says
Please let me know when your Etsy store is up and running. Thank you!
Arlette Kendall says
I am interested in purchasing your templates but can’t find them on etsy. Can you give me the link please?
Patty Campbell says
Please email me when the templates for the cone trees are available.
Thanks
erin pruitt says
I REALLY love these trees, but can’t seem to find the info on the base? What is it you are using and how are you attaching them??? I must be missing something since no one else seems to be asking! Can’t wait to make some of these!
Cyndy says
I talked about in the tutorial and even showed pictures that I use candlesticks. Not sure how you missed that! LOL! If you go back and read through the whole tutorial you will see how I do it. Thanks so much Erin!
MIshelle Walters says
Hi i just looked on Etsy and didnt see the template yet. Can you email me when they are listed. I would LOVE to buy them. Thanks so much
Denise Copeland says
Love these! Could you please tell me where I can find the templates on Etsy.
Thank you.
Patti Thomas says
I would love to purchase the template…………..please email me as soon as they are ready to purchase. Thank you.
sherri schriver says
I would like to know when your templates are ready to order. Thanks
Lynn Pierce says
Please let me know when the templates are ready. I would love to make these!
keira schwarz says
I’d love to buy the templates once you have them! You are a pinterest phenom, y’know!
thanks,
Keira schwarz
Kerry says
Please let me know when the templates are available.
Janice says
These trees are so pretty. Please email me when the templates are ready. Thank you!
Sue says
We just decorated with cone trees that were left from a store closing (their decorations for Christmas) and decided we need to replicate the idea in a smaller version for table centerpieces. We are using leftover Christmas wrapping paper.
Dee Dee says
Just made them and love them! Thanks for the very precise instructions. I am having trouble with the cone tips looking completely “pointed” any ideas as to what I can cover them with?
Jamie B says
Your cone trees are gorgeous! Thank you so much for sharing how you made them. I made a few trees from your instructions you shared and they came out great! I hope it’s okay, I did a little round-up of these cone trees and just couldn’t resist featuring yours.. especially since your instructions were so helpful to me. You can see it here:
http://crafteronabudget.blogspot.com/2012/11/cone-shaped-christmas-trees.html
I really love your blog..I am your newest follower 🙂
Cyndy says
Thank you Jamie! Love your blog too and love your round-up of tree cones! So fun! Thank you so much for including me and my cones!
Michelle says
These are trees are so great! Depending on what kind of fabric or trim you use, they can be cute or elegant. I used wine & champagne glasses as bases because I didn’t have enough candle holders. Use card stock circles or stuff the tree with paper towel if you need them to sit up higher. Thank you so much! I did them without the template but wish I would have just bought it–would have been easier for sure.
Kevin says
Thank you for a wonderful craft project. I can’t believe that someone was selling them for the big buck that you mentioned. I made 5 for my new christmas redo and love the results. Your instructions were perfect. Thanks again. You are my new favorite craft guru.
Happy Holidays to you,
Kevin
Annette says
These are beyond beautiful and just what I need now that we have downsized to an apartment. Never content to just take a pattern and make it as is I have a suggestion to tweak these trees. Adhesive is expensive and difficult for me to use as I am in a wheelchair and live in cold Minnesota—so I am going to try attaching the fabric to the cone by sewing it on with my sewing machine and a heavy duty needle. So I’ll take a hunk of fabric large enough to cover the cone, sew it down with straight lines or freeform machine quilting, then cut off excess fabric. If that goes well I’ll think about adding a layer of quilt batting on the next one and get more of a 3-D effect. What do you think?
Haylee says
Beautiful trees!! Thanks for sharing how to make them. They’ll look great on my piano!! I’m linking to this post on my blog so others can make them too. 🙂
Karen says
This question might be obvious but on my printer I have 2 settings that are:
Fit to page
Actual size
Do I use the “Actual size” setting?