This is one of those projects that has been in my mind for about a year now. With Thanksgiving and Christmas around the corner, I thought I would go ahead and finally experiment with it so I could share it with you for a possible gift idea or even better yet, something fun to make for yourself! You know you need one!
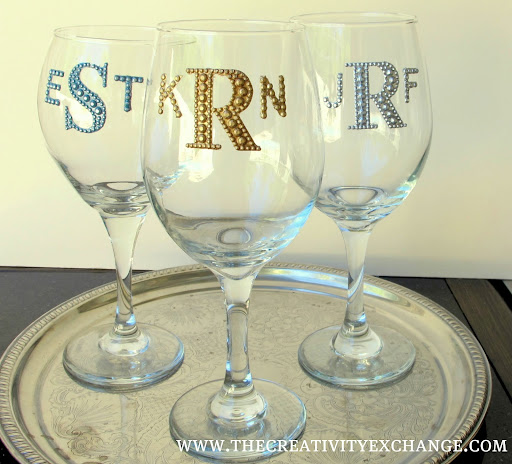
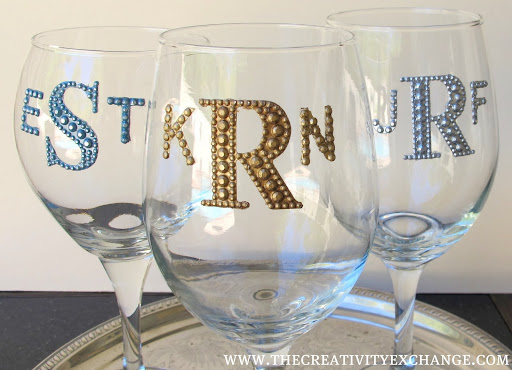
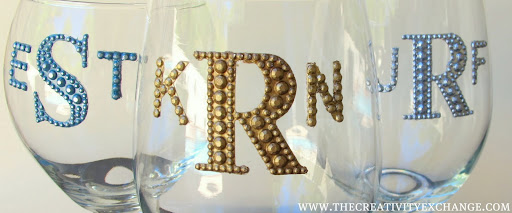
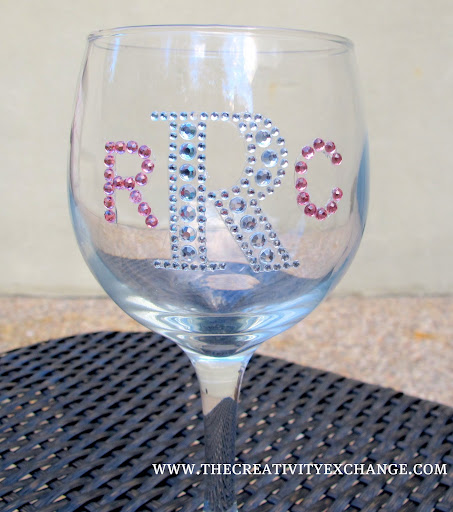
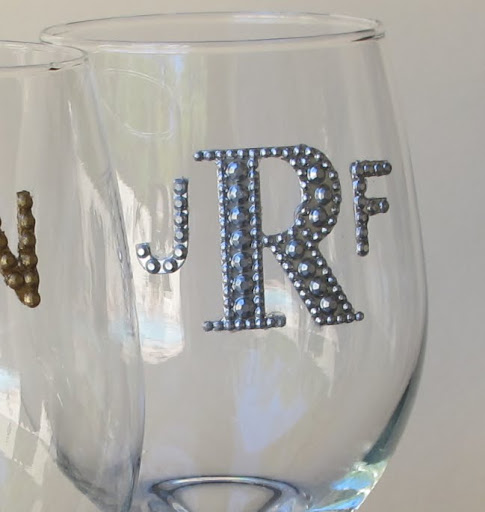
There will never be a question which glass is yours with this fun project! You can easily create monogrammed wine glasses or other glass items by painting rhinestone sticker letters with a metallic enamel paint and attaching them permanently to glass with the super strong E6000 glue.
Ok, before I go anything further, if you simply want to use the rhinestones themselves and you do not want the metallic look that I created with the enamel paint, you can but it it will only be semi-permanent!
The reason simply using rhinestones alone (without the enamel) is semi-permanent is that the individual crystals that make up the design of the letter are glued to a plastic backing that can easily come off if pulled hard enough or washed a time or two. Nothing that I have found seals the crystals permanently without clouding up the crystals, so the next best thing is to paint them in a fun metallic color with an strong enamel paint to seal the stones permanently. However, you can follow part of this tutorial and glue the letter on with E6000 and then veer off the tutorial and paint the letter on the glass with clear Sally Hanson (Hard as Nails) clear polish and it will be semi-permanent. Also, for just a fun thing to do at a dinner party, have the letters ready and simply have your guests attach their monograms to a dollar store wine glass and let them take it home but it won’t be permanent.
So let’s jump right into the tutorial for creating permanent monograms for our wine glasses…
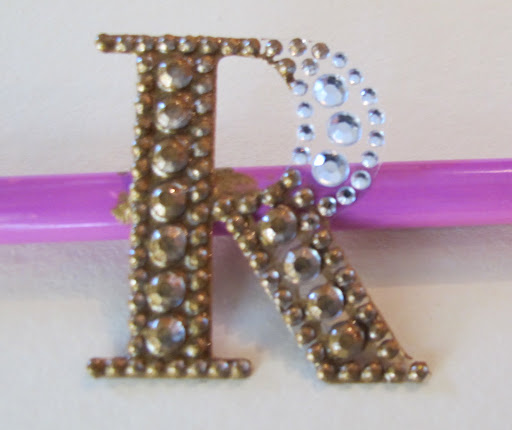
You can find rhinestone letters in various sizes at your local craft store in the scrapbook section:

There are so many different sizes and shapes of rhinestone letters and the possibilities are endless. For the monogrammed glasses, you can either simply buy one large letter for a last name initial or, if your more adventurous, you can create a three letter monogram by using a larger rhinestone letter for the last name and two smaller letters for the first and middle name.
When you’re picking out your letters, be sure that you hold up your letters together and compare sizes to make sure your three letter monogram proportions will look good (some rhinestone letters are too small).
For my wine glasses, I purchased them at the Dollar Store. I couldn’t believe how big and how nice they were that I found! Be sure and prepare your glass by washing them and wiping them with alcohol.
Next, remove the letter from plastic sheet and place on a pencil like this:
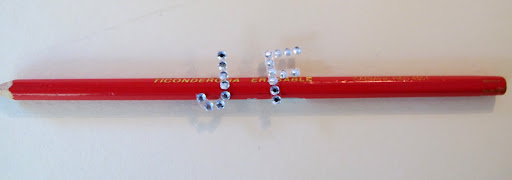
This will allow you to paint the letters and allow them to dry on the pencil without any paint pooling on the sides. The enamel paint that I am recommending is made by Testors and is available in the model car/airplane section of your craft store and it looks like this:
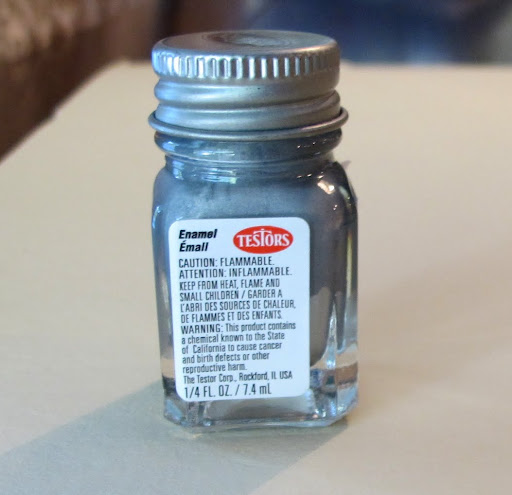
It comes it a cute little bottle and is usually around $1.39. Be sure that you buy the enamel as they sell acrylics in the same little bottles! The color selection is awesome and there are lots of colors and metallics to choose from. For my letters, I used 1146 Silver, 1144 Gold, 1182 Brass and I picked up several small jars of thinner sold right with the jars of enamel. I just used cheap water color paint brushes. Here are the colors again for you to see painted on:
Ok, now you’re ready to paint your letters. Keep in mind that your real goal is to seal the letters onto the backing that the rhinestones sit on so you want a lot of paint on and in around the letters and around the sides. But you don’t want too much where it takes days to dry!
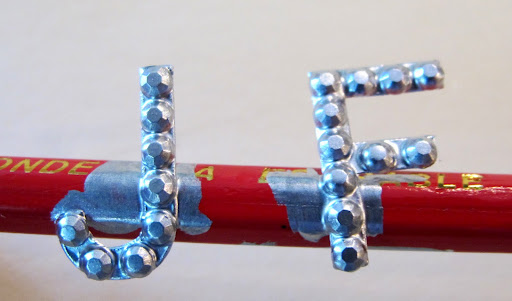
Allow your letters to dry on the pencils for at least three hours! This enamel paint actually takes a full 24 hours to dry, but after three hours, you can go on to the next step without messing up the paint. I just did all of my letters at one time on about six pencils. Use your paint thinner to remove enamel off of brush.
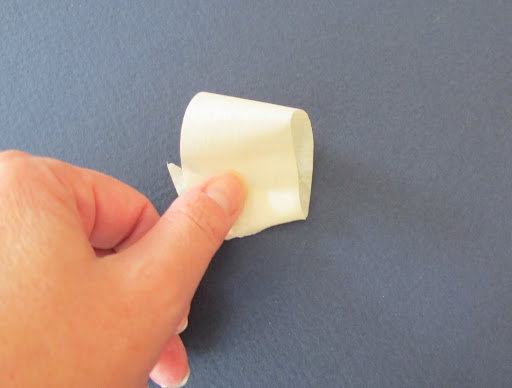
After three hours, take a piece of masking tape and roll the tape around and attach so that your roll around is all adhesive side out:
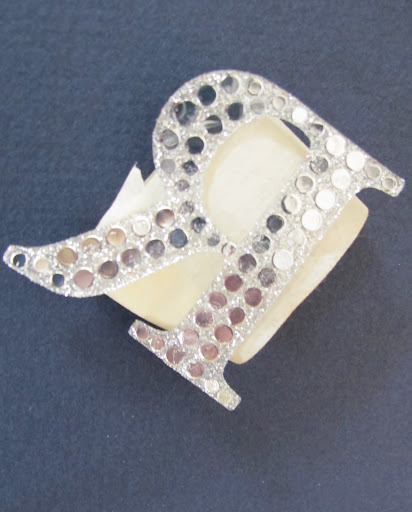
go ahead remove your painted letter from the pencil and turn your letter over and place onto the tape exposing the backside of the letter (don’t worry if you have some wet paint on the back):
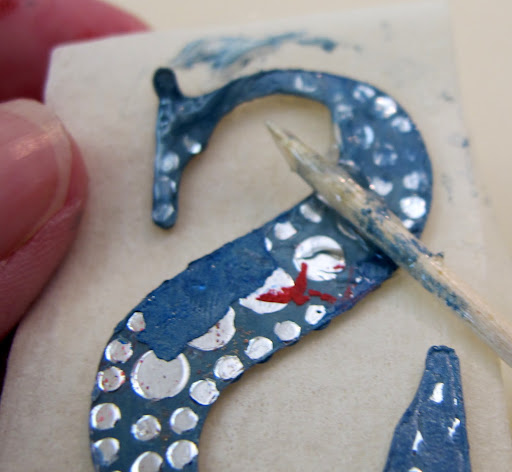
squeeze some E6000 onto a disposable lid or on tin foil. I tried several different glues and the only thing that worked best without damaging the foil back was E6000. Using a toothpick, smooth on your E6000 to the back of the letter. Be sure to get glue on every little corner and every spot. You want just enough to cover but not too much. It gets real goopy because of the adhesive already on the back of the letter and paint residue but its ok, just be sure and turn your toothpick to the side and go down your letter like this to smooth out glue:
When you’re ready, slide two fingers in the tape loop and lift and bring letter up to the glass to place. If you look through the backside of the glass, you can see how to better position your letter. Go ahead and place letter onto the glass with your fingers still through the tape loop:
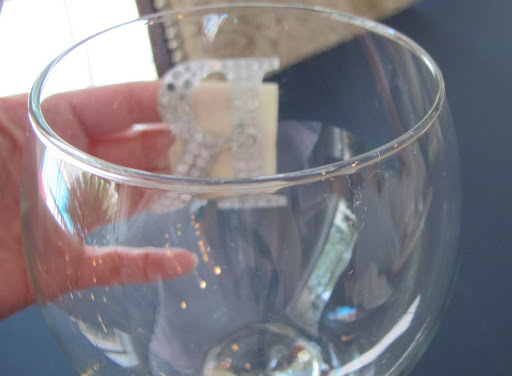
Hold your letter for about a minute (you can adjust letter some after you remove the tape).
To remove the tape off of the letter, using your fingers in the tape, gently pull back at the top to expose the top part of the letter and with your other hand, hold the letter and then go ahead and remove the tape while holding the top part of the letter in place.
You can go ahead and adjust your letter by pushing gently. Once you get it where you want it, get a new toothpick and use the sides to push down and the point for corners to secure into glass. Don’t worry if you have glue and paint everywhere on your glass, you can easily clean up by using a Q-Tip with a very small amount of alcohol on it (I just dip the Q-Tip in alcohol and squeeze out excess with my fingers as too much alcohol is not good). Just swipe along edges with the Q-Tip multiple times and eventually any extra glue or paint will clean right up:
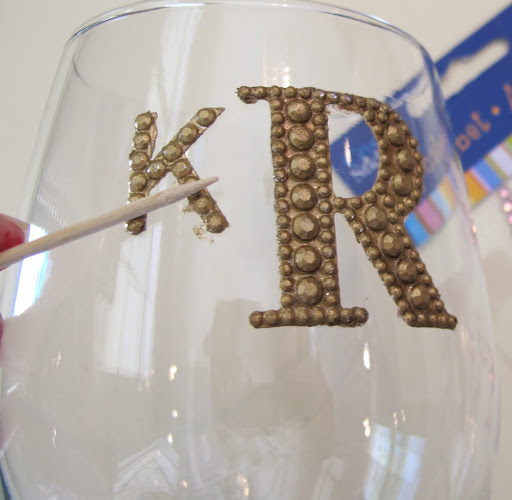
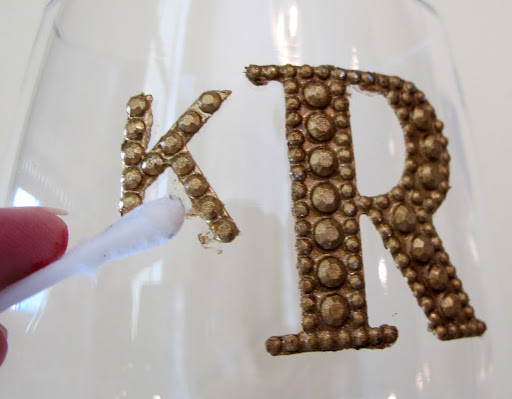
You can also use a tooth pick dipped in alcohol to clean up edges and scrape.
If you’re creating a three initial monogram, at this point you would add the other letters. Again, you can easily position letters by looking through the backside of the glass to help gauge where you place the letter.
After you are completely done, allow your glasses to dry for a full 48 hours. Both E6000 and enamel paint take a long time to full dry.
While the glasses will obviously need to be hand washed after each use, I would try and avoid getting too much water on the letters or submerge them for long periods of time.
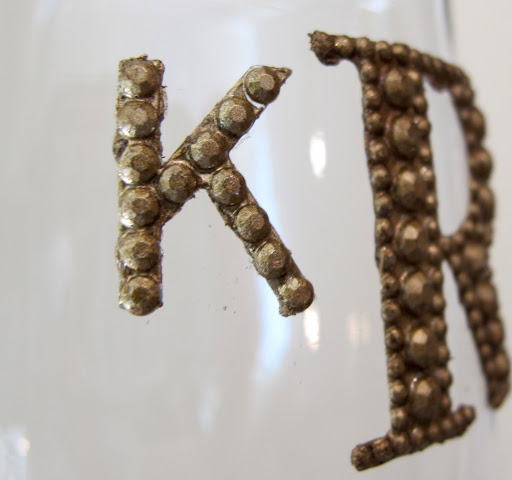
There are so many possibilities with this project with all of the fun color choices! These glasses when they are finished look like hammered old world metal. They turned out so elegant and I am so excited to use these with my family for Thanksgiving so we can all keep up with our glasses!
Well, that’s it for now friends! I hope you all have a wonderful weekend and I will be back next week with two fun holiday projects! As always, thank you so much for your emails, comments and notes as I am so appreciative and thankful for you taking the time to share your thoughts!
Cheers!
Cyndy
Sharing this post with these fabulous blogs here and;
Amanda Eck says
LOVE this! but girl I dont have the patience to sit and do that. Your awesome!!
Amanda Eck says
p.s. forgot to mention LOVE LOVE the new look!!! I bet you are so exited thats finally done!
Molly Stokes says
Love it! I think this would be great for a dinner for your wedding party, bachelorette etc. Then they would have souveneirs.
Cyndy says
Thanks ladies! I thought this would be great for a party too! Such a fun way to keep up with everyone’s glass and then they can keep it as a favor! Amanda, I think I made this sound a lot more difficult than it really is! LOL! I always try and provide every little detail, which can make it sound complicated. It really is quick and easy and just allowing for the drying time is where the wait is. Have a great weekend!
Michelle says
I am SO excited to try this out! Thank you so much for sharing all of your awesome and affordable DIY ideas! You’ve made it possible for me to learn to make tees for my kiddos, vinyl crafts I didn’t think I could do until I saved up for a machine, and so much more! I love your site! THANKS
becky mercado says
These are absolutely beautiful.
they’d make great Christmas presents.
Alida says
These would be perfect for his and her glasses at a wedding reception or lovely christmas gifts.
I’d love to invite you to share this project at my Thingamajig Thursday Party… http://radcrafter.com/2011/11/thingamajig-thursday-party-2/
Jamie says
What an awesome project! Just wanted to let you know I featured it today on “You Sew Rock Me Fridays” at sewrockin.com.
You can see it here: http://www.sewrockin.com/2011/11/11/you-sew-rock-me-fridays-4/
I look forward to seeing what you come up with next!
Jamie @ Sew Rockin’
Katherines Corner says
very clever. A lovely idea for a gift too. xo
Kimberly says
Those turned out so gorgeous, they seriously look like something high-end you’d find in a specialty catalog. NICE WORK!
Best,
Kimberly
Rhonda G says
Fabulous idea! Thanks for sharing the tutorial! May just have to “borrow” this idea!
~Coming through Amaze Me Monday! Newest Follower! 🙂
Amber says
These turned out amazingly beautiful!!!
Jen @ Sunny Vanilla says
I love the glitzy monogram look on these. Great idea! Thanks for sharing…stopping by from Skip to my Lou.
Nikki@EverythingUndertheMoon says
I love these monograms. Theyre so pretty. New follower. Would love it if you would stop by and share this at my linky party 🙂 http://everything-underthemoon.blogspot.com/2011/11/bedazzle-me-monday-8.html
Also, PRETTY PLEASE check out Random Acts of Kindness Week going on right now!! Would love to see you be a part of it! http://everything-underthemoon.blogspot.com/2011/11/kindness-and-thanksgiving.html
The Rebel Crafter says
This is fab! Just found your site, its great!
Anne says
Love your new look !!!
and Love this idea, as always you are too Brilliant!!
Hugs,
Anne
Ada says
Made one for my friend’s 40th birthday and it turned out great. Thanks for providing easy to follow directions and I will be making many of these glasses for gifts in the future.
Dona@Cheap Rhinestones says
This project is perfect for upcoming Christmas. I made one of this for my special one. Great sharing ideas.
Nancy says
This is so fun. My winter sports series gives out pint glasses for those athletes who “place”. Someone said – what are we going to do with these? I said – I’m bedazzling mine! I’m going to do some for the rest of the team, too!
Mwronski says
Love this! Thank you for sharing! I was wondering if you could just use clear nail polish to set the jewels down instead of the paint. Do you think this would hold them just as good? I just love the simple look of the jewels without having to paint them. Thanks again!