
I hope everyone had a wonderful Thanksgiving! We had a wonderful time with our family and we are now in full Christmas decorating mode and the endless boxes of Fa La La have come out of the attic! Yikes!
I thought it would be a really good time to post a few holiday decorating tips and tricks that I picked up over the years from my decorator friends and my previous career in retail merchandising for several large department stores. I wanted to post some tricks that may be off of the beaten path and that I haven’t seen mentioned anywhere that you might find really useful in your holiday decorating.
First up (#1) is an easy way to secure and work garland or ribbon into a artificial tree or wreath so you get that really pretty professional tree garland look:

This trick is universal and is used the same way either with the super wide garland that is out right now or it can be used with basic width ribbon. What’s really awesome about this trick is that you don’t have to really fluff and poof your garland because it all sort of happens naturally because of this technique!
You start by trying the end of the ribbon (or wide mesh garland) onto a branch at the top backside of the tree:


Bend the branch under to hide the tie:

Next pull the ribbon around the top part of the tree to your first desired stopping point and squeeze the ribbon together with your thumb and index finger this:

and then take a branch and go about halfway down (the branch), fold it down tight over the place where you have squeezed the ribbon so that the branch has now squeezed the ribbon and is securing it. It should now look like a long line like the picture:

Now take the branch with the squeezed ribbon and instead of folding it down like you just did, hold where you folded the branch and pull upwards with the excess branch on the tip and it should look like a backwards “L” and the excess branch sticks out:

Now that your ribbon is secured with the branch, you can pull on it if you want a poofier look or pull from the other side to tighten:

You can really see what I mean on this tree that I helped set the garland for a friend with really wide mesh garland:

My friend still has to add her ornaments but narrow or wide mesh or ribbon done this way is really easy and just by pinching it with the branch, you get natural lines in the garland without having to adjust over and over!
Another fun trick (#2) that we use to do in the stores was combining three ornaments on one ornament hook:


I don’t have a finished tree yet to show you the overall look but trust me, it adds a whole new look! I do it with my smaller trees and sometimes on my big tree. You can also do this on wreaths as well.
Next (#3) is using berry sprigs in the top of the tree. You may have seen this before but just in case you haven’t, I thought I would share it:


I just love this look and for smaller trees it takes about 10 springs strategically placed around the top and for large trees about 20-30 but it looks so cool! It really adds a fun and dramatic look and I like to mix mine with feathers and gold and wine colored berries. Sometimes I concentrate a bunch at the top and add a few spread out ones throughout the tree. Also, don’t be afraid to add some sprigs all throughout your tree. You don’t need a lot but it really makes a tree pop!
Next tip (#4) is to get really creative with smaller tree bases. Think about putting them in urns or outdoor ornate planters like this one for an elegant look:

for my daughter’s tree in her room, I use a pink metal garden watering can as her base:


Think about fun and whimsical bases as well. I use a dollar store popcorn container for our circus tree in the playroom:

There are so many beautiful container possibilities such as a monogrammed silver ice bucket or an antique urn or maybe a soup toureen from your wedding china.
My next tip (#5) is how to make your own garland using sprigs:

I love using sprigs to make my own garlands because sprigs are inexpensive usually around $1.00 each and it only takes 8-10 to make a nice long gorgeous garland. I turn my sprig garlands into wreaths and I also place them at the base of large candles and I drape them on some of my smaller Christmas trees and my tree cones:

To start off making sprig garland, I purchase about 8-10 long sprigs in my desired berry colors:

I then lay one sprig on top of another using the bottom branch of the first sprig and the top branch of the second one on top and I twist the branches around together multiply times:


Because the sprigs are nothing but covered wire, all I do is connect one to another and twist one sprig around another tight about every two inches. I even twist around the berries to help secure at all points:

If I am making a wreath, I will secure with floral wire as well just to make it extra secure:

My last tip (#6) is how to make a four looped bow:

I use four looped bows for so many decorating projects and Christmas and I also use them for handmade gifts such as my fun holiday frames:

Easy Revamped Holiday Frames {December, 2010}
Instructions for Four Looped Bow
1) You can do this with any ribbon. I prefer the wired silk looking ribbon best for this particular project because I can really fluff and crumple the ribbon.
2) Make a double bow loop with the end of the ribbon going past the center:

3)Pinch together your two loops in the middle and wrap the ribbon around the center once:

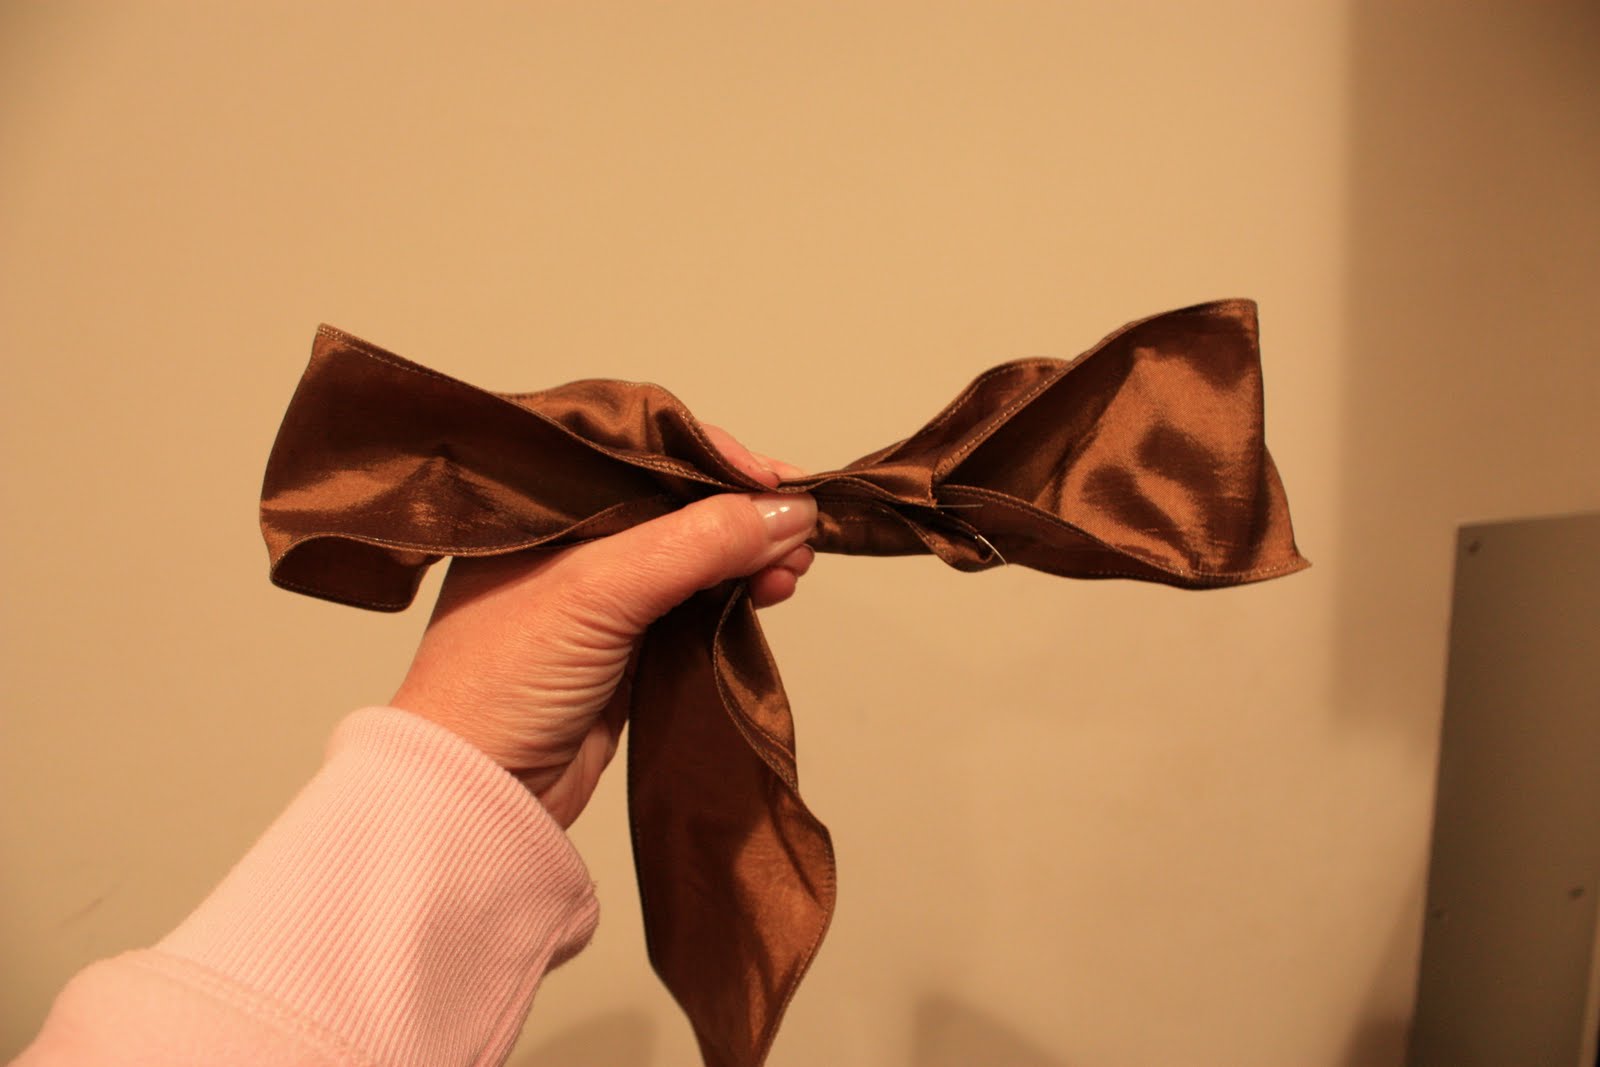
4) Taking the ribbon from the center of the bow, make a 3rd loop and come back to the center of bow and pinch to hold:


5) While pinching and holding the center, make your 4th loop and bring ribbon back to the center and now wrap around the center of the bow once sort of tight to secure.
6) Wrap the center of the bow a second time loose to make it look pretty:
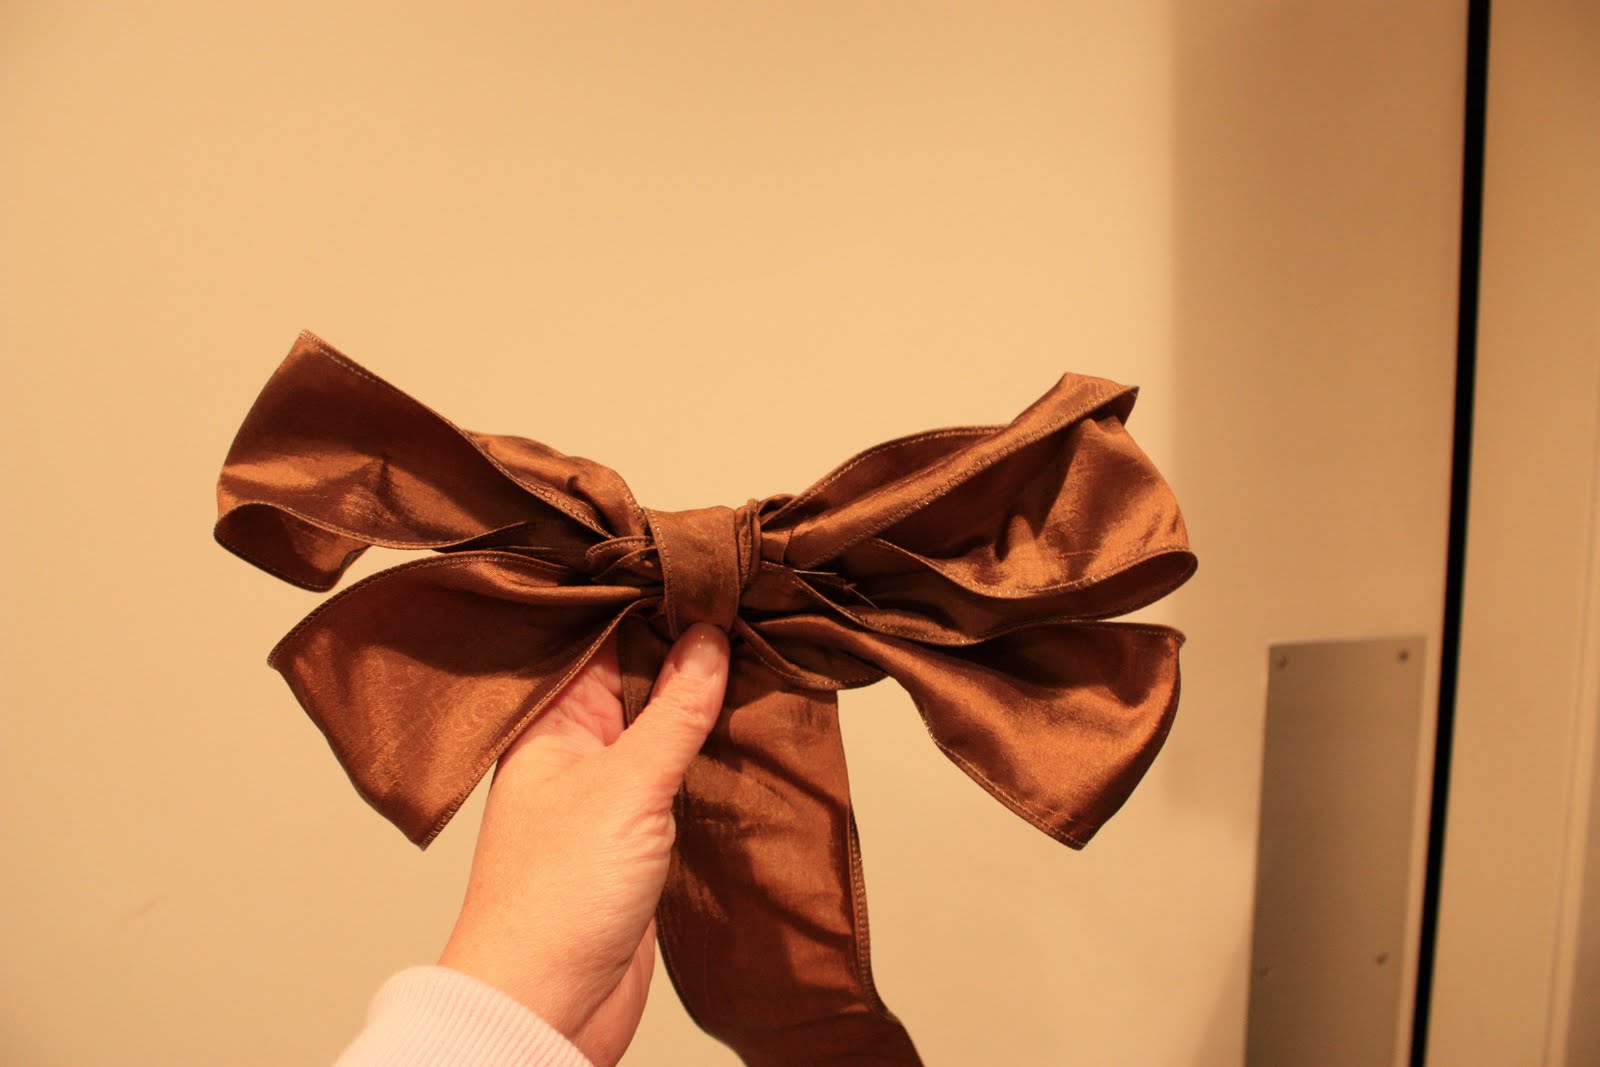
7) Cut your ribbon on the backside of your bow, allowing an extra two inches to hot glue and fold over to complete your bow.
8) Hot glue (well) the backside of the center of your bow and attach to frame. Wait until glue completely dries and fluff the bow.
I hope there is a tip or two that you can use here as you “deck the halls”! I would love to hear any tips and tricks that you may have and feel free to share them with us in the comment section at the end of this post.
I have several handmade gift idea projects coming up next week, so be sure and check back soon!
Have a great weekend friends!
Cheers!
Cyndy
Deb says
Great post………I love your tree you made for your daughters room and the garland you made from trees. Thanks for sharing with us today!
Kristen@fit2feelbetter says
Thanks for all of the great tips! I especially like the sprig garland idea. My tree needs a little something else and the sprig garland would be perfect!
Tina says
I love all your posts, especially love the trees!
Kay says
I just bought some beautiful ribbon to use as garland for my tree & wasn’t sure how to wrap it. This is an easy way to secure it and make it pretty. Thanks!